Enterprise Architect Notes
Directions for EA 16.1
Version 16.1 of Enterprise Architect was first distributed in fall, 2023.
Directions for older versions are
here.
- Installation: on your MSOE laptop, click on the Windows icon in the
lower left (Start) and type "Company Portal". Run that, and
use it to install version 16.1 of Enterprise Architect. EA will request a
key; return to the Company Portal and look at the Description
area; there is an Installation area i nthat which gives you the legal
key. Read this box carefully!
- For other computers, there are trial versions of EA available, but
they provide limited use. You will likely need to use your MSOE
laptop to use EA.
- Version 15 and earlier used
.EAP format files; when
loading these into EA 16 it will prompt you to change file formats.
Use the default, .QEA for personal projects.
- If your screen is blank, try the following
- Visit the Start tab, click on Workspace Layouts, then
double-click on Default. This should reset the screen layout.
- Visit the Design tab and select Browse. This will
reopen the project and model browser on the left.
- Reverse engineering a class model using EA 16:
- Ensure the project builds so the import does not fail mid-way
through.
- Create a new EA project. This pops up a dialog asking where to put
the project; I recommend either putting the EA file at
the top level of the project or in a doc folder.
- Click on the Design tab and select Add Package. Name
the package appropriatly.
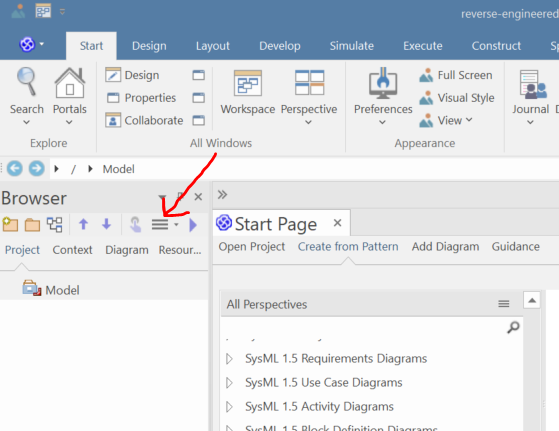
- In the Browser window, click on the new package and then click on
the triple-line menu marked by the arrow in the following image:
- Select Code Generation then select Import Source
Directory.
- Set the source type to Java.
- Click on the triple-dot button to the right of Root
Directory and browse to the folder containing your project source
code.
- Click OK twice to run the reverse engineering tool.
- When prompted, I set the current package to be the namespace root.
Close the reverse engineering dialog.
- If desired, select the Layout tab, pick Diagram Layout
(in the middle of the bar), then Apply Default Layout.
- Move the classes so they fit nicely on a single page or as close to
a single page as you can et.
- Move the associations, generalization arrows, and role names so that
elements do not overlap and have clear attachments.
- Creating a .PNG of your model (class, sequence, etc):
- If necessary, reorganize your classes and lines to minimize crossed lines and
and empty white space. This should result in both placing related classes
together and fitting the diagram on a single page. If it will not fit on
a single page, be sure to minimize the number of pages while keeping the
diagram readable.
- Open the Publish tab.
- Select Save | Save to File.
- Change Save as type to PNG.
- Browse to the desired location and set the name in the normal way.
Do not take a screen shot instead. The resolution will be inadequate
for grading. Also important: when pasting the screen shot into a
document or converting it to a PDF, watch that your final document does not
have lots of white space on the page. Diagrams are full of detail, and if
you are not careful to keep images as large as possible then that detail
will be impossible to read even if the document is zoomed to the maximum size.
- Creating a sequence diagram:
- Right click on the class model, select Add Diagram....
- Select UML Behavioral and then the triangle by Sequence.
Select UML Behavioral::Sequence.
- Click on OK.
You can then do the following:
- Pop out the diagram by dragging the page title (often "Class
Diagram") off of the main EA window.
- Drag a class from the class diagram to the sequence diagram and
select Instance(Object) to create an instance of the class
- Use the Quick Connect arrow (the small arrow) to add an arrow from
one class's lifetime to another class's lifetime, double-click to bring
up the properties, and set Lifecycle to New (bottom right of form)
to show creating a new instance.
- Use the Quick Connect arrow to create an arrow from object to
another, open the Properties for the arrow, and set the Message to be the
name of an method to show a method call on an object.
- To create a return arrow, click on the method activation box that is
returning and use the arrow icon to draw an arrow to the receiver. Then
click on the arrow, go to the Properties box, scroll to the bottom, and
put a check mark in Is Return.
- Sometimes you need to split or join activation boxes on a sequence
diagram. To control what items are in a message group, right click
on the message arrow, select Activations, and then use Start
New Message Group to split an activation box or Extend Source
Activation Down or ...Up to join two activation boxes.
- Tips for class diagrams:
- Opening the properties window: to re-open the docked
properties window (rather than double-clicking to open it), click on
the Start tab, click on Properties (in the All
Windows section), then select Properties under General.
- Making associations travel around other classes: Create a
direct association, then right click on the line and select Bend Line
at Cursor. This will add a small box to the line that you can move to
move the mid-point of the line. If necessary, you can add other bend
points so the line can be routed around another class. You might also
experiment with changing the Line Style to auto-routing.
- Almost all lines can be moved by clicking on them and dragging. This
is especially important when association and generalization lines are on top
of each other.
- The most common multiplicities are
1, *,
and 0..1; others should be driven by specific requirements
(such as "a tenant has up to three pets"). But if the requirements
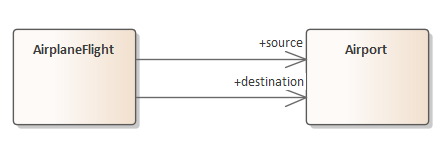
specify different roles for the multiple assocations, be sure to
capture that in the diagram:
- To create an interface class, drag the Interface object from the
toolbox. One might imagine it would be possible to add the stereotype to
an existing class, but it appears this is not possible.
 If this was a domain-level class diagram, the associations could be shown
as undirected (since direction in domain-level diagrams is not required).
- Tips for EA in general:
- Creating a PDF of a diagram: The best
way is to click on Publish, select Save, and then Save
to File. For very complex diagrams, change the file type to
.svg, but for diagrams with fewer than 10 classes the
default .png format works. In any case, the resulting file
can be saved on your computer, loaded into a word processor, resized to
fill the page, and then saved to PDF. Never use print-to-screen;
the details are impossible to see that way. Do not use Print|Print to
PDF, either, because this often splits the diagram in random places or
otherwise makes the diagram hard to read. The Publish|Save
operation produces robust, gradable images.
- Double-clicking on the tabs at the top of the screen will open and
close the ribbon. Closing the ribbon gives more space for the drawing
area.
- Start | Preferences: can control things like opening in
full screen mode.
- Diagram notes are a great way to add comments and other
textual information to a diagram. Open a diagram, open the Toolbox (you
may need to click on the >> in the upper left corner of the
diagram window), scroll down to Common Elements, and
drag Note onto your diagram. The text for the note goes into an
empty Notes box that is typically in the lower right.
- Marking a class as abstract: Click on the class and
select Properties. Click on the Details tab in the lower
right corner and check the box Abstract.
- Turning off type information: Right click on the diagram,
select Properties, click on Features on the left,
clear Show Operation Return Type, and set Show Attribute
Detail to Name Only and Show Parameter Detail
to None.

