This is a 2-week lab.
In this lab, you will be adding an additional shape - Bezier Curve - to your collection. This activity can be deferred to the second week of the lab.
Additionally, you'll be integrating the transformation methods you have learned about in class recently into your existing GUI application (from Lab 4). Once you incorporate 2-D transformations into the program, you will be able to rotate, pan (translate), and scale (zoom/unzoom) the shapes you create and display.
The transformations will be carried out via a ViewContext object that you create and manage from within your derived shell. Based on user input to your modified GUI, the you'll call methods of ViewContext to internally set up the necessary transformation that applies rotation, translation, and scaling for converting from one set of coordinates to another (from model coordinates to window coordinates). Furthermore, the ViewContext object must support the inverse transform as well: converting from window coordinates to model coordinates.
In addition to the usual DrawArea pointer, you will now also pass a pointer to the ViewContext object to your image, and subsequently to all the shapes, as part of the Draw sequence. Each derived shape will then use the transformation methods of the ViewContext object to convert it's local modelling coordinates into window coordinates, such that the shape appears in the window in the desired transformed position.
In a similar fashion, when you create new shapes via mouse input, you will have to convert mouse coordinates (which are natively generated in window coordinates) to model coordinates, so that the shape is initialized with model coordinates rather than window coordinates.
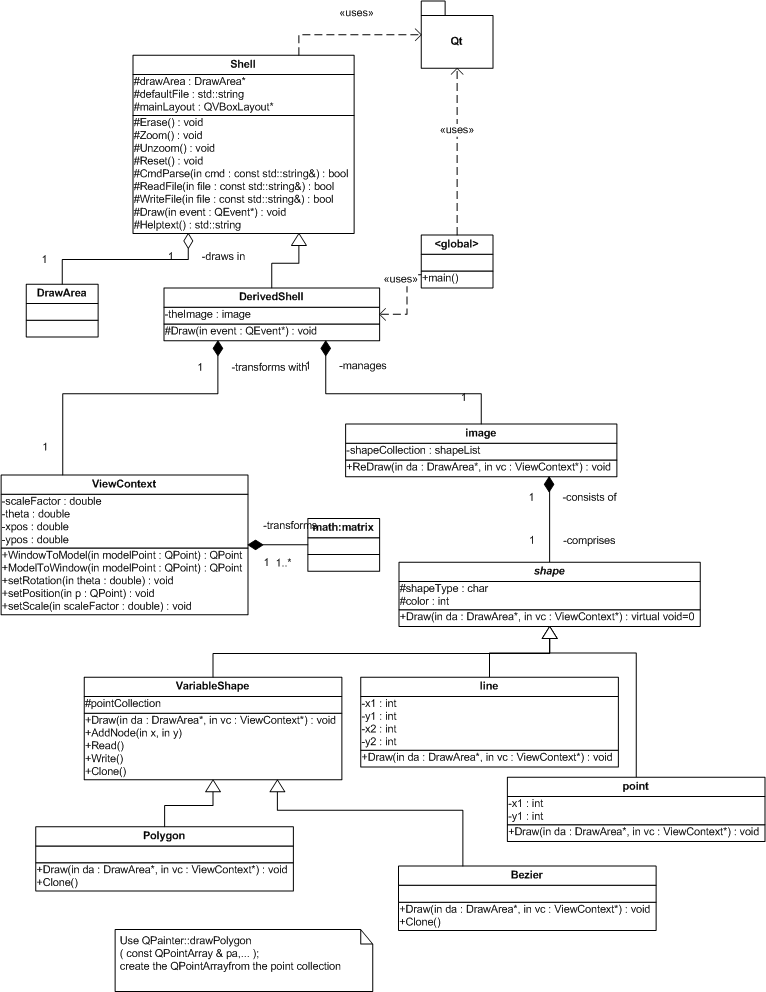
Here is the UML class diagram illustrating the relationship between the classes, including the new ViewContext class:

Note: The constructor of the ViewContext class should be written such that, initially, the transformation parameters are neutral; that is, no rotation, no translation, and no scaling. (T=I and S=I). This implies that the model and windows coordinate systems are coincident to start out with.
Provide the setXXX() mutator methods indicated in the UML class diagram to the ViewContext class that allow you, via the derived shell UI, to manipulate the transformation parameters of the ViewContext object. Whenever one of the mutator methods is invoked, the internal transformation matrix of the ViewContext object should be re-formed.
Whenever it is time to update the display, your derived shapes' Draw methods should invoke the ViewContext ModelToWindow() method to compute the window coordinates corresponding to each constituent model coordinate. These computed window coordinates are then the ones passed into the QPainter drawXXX() methods. Note that you must never modify the stored coordinates of the derived shapes; once a shape is created, its model coordinates remain invariant - only the computed window coordinates (used for drawing purposes) change.
Similarly, when you are creating a new shape with via
mouse input, use the ViewContext WindowToModel() method to convert mouse
coordinates to model coordinates, which you use to initialize the shape.
- Work in phases. For example:
- get Read and Write to work for all your shapes
- modify your GUI, adding the various additional buttons. Connect them to handlers via the SIGNAL/SLOT mechanism
- create a skeletal ViewContext class whose ModelToWindow and WindowToModel methods initially just echo back the supplied coordinates without applying the transformation.
- connect your new GUI handlers to the setXXX() methods of your ViewContext class. Complete the setXXX() methods such that the transformation parameters are modified appropriately.
- implement the Reset handler to make the appropriate calls to the ViewContext in order to apply the correct scaling and translation parameters in order to fill the entire window with your shapes. Note that this is an involved process that requires you to compute the minimum and maximum coordinates across all shapes in your image collection.
- implement the Bezier class last
- #include <matrix.h> // you might want to place it in /usr/local/include on your computer
- The constructors for the matrix class do not guarantee that any particular values are in the matrix. Use .Null() for a matrix of zeros. Use .Unit() for an identity matrix
- The easiest way to allow programs using matrix.h to work with Qt is to disable exceptions in the matrix class. To do this, update your .pro file to include DEFINES *= _NO_EXCEPTION
- For UI modification, look up QHBoxLayout, QHButtonGroup, QPushButton, and QLabel. You may also want to experiment with the dial, slider or spinbox controls.
You will need to demonstrate the following to me during the week 8 lab meeting:
This milestone must be reached by the week 8 lab; otherwise, late points will begin to incur.
You will need to demonstrate your completed project to me during the week 9 lab meeting.
This is a 2 week lab.
Fix all errors from your previous lab!
Submit your assignment following these instructions:Be sure to keep copies of all your files, in case something gets lost.
Your lab grade will be determined by the following factors:
Program qualityIf you have any questions, consult me.