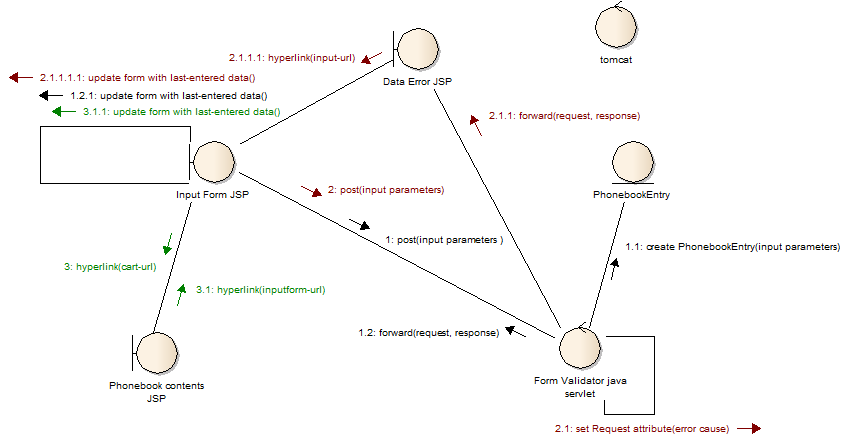
In this assignment, you will refactor your form-processing web application from the previous lab to incorporate the Model-View-Controller pattern, implementing View-related components as JSP's. Your app must retain the multi-threading and multiple user sessions aspects you introduced previously. You do not need exception-based error handling in this lab; instead you will handle errors in input explicitly from within a servlet using "regular" conditional logic, and forwarding errors to a JSP whose job is to display custom error messages.
Create a new Tomcat6-based Dynamic Web Application project in J2EE Eclipse named <yourname>-Lab8.

In this version of your web application, all forms and output (views) must be written as JSP's - your app must have no static HTML pages. You will only have one "regular" servlet - a "Form Validator" (FormValidator.java) - which must not generate any type of HTML output at all. Instead, this servlet functions as your application's Controller, delegating all page generation to the various JSP's (Input Form, Phonebook Contents, and Data Error) described below.
The Input Form JSP (e.g. Phone.jsp) is the default webpage that is displayed when you enter the url http://localhost:8080/<yourname>-Lab8 into the address bar of a browser. Add this JSP to the welcome-list in the Deployment Descriptor. This JSP replaces the Phone.html and implements the input form. It also gets the default values (if any exist) for the firstname, lastname, and phone number from the Session attribute.
The UML Communication diagram above illustrates the sequence of operation of the web app for both normal and error conditions. The first sequence (the user enters valid data) begins with the message numbered 1 - the POST (or GET) request that is generated when the user submits the Input Form. The error sequence (the user enters invalid data) begins with the message numbered 2. The sequence starting with 3 indicates what happens when the user selects a "display phonebook" link located on the Input Form.
As in the previous lab, use JavaScript in the Input Form to do client-side validation of the form for empty input fields. Your Form Validator java servlet must perform server-side validation of the data sent by the Input Form to guard against "???" entered in any of the input fields, or non-numeric values entered into the phone number field.
When the data is determined to be valid, the Form Validator java servlet:
| creates a new PhonebookEntry object (the Model) | |
| adds the new PhonebookEntry object to the Session | |
| forwards the request back to the Input Form JSP, which resets the form's input elements with the last valid data entered (which it can retrieve from the Session). Note: When you start the application for the very first time and show the initial Input Form, all input fields should be blank (since the Session will not yet exist and thus not contain any valid data). |
When the data is determined to be invalid, the Form Validator java servlet:
| adds a specific error cause (a String) as an attribute to the Request. Note: You should create multiple error causes, such as "non-numeric value entered as phone number" or "??? entered in firstname field", "??? entered in phone number field", etc. | |
| forwards the request to the Data Error JSP | |
| does NOT create a new PhonebookEntry object, nor add any PhonebookEntry object to the Session |
The Data Error JSP informs the user of form data that was entered in error, displaying the error cause in the web page by retrieving the error cause from the Request. The Data Error JSP page displays only one hyperlink, which returns the user to the Input Form. The Input Form should be displayed with the last valid data entered, again retrieved from the Session object.
When the user selects the hyperlink on the Input Form to view the phonebook, the Phonebook Contents JSP displays all items in the collection maintained within the current Session.
When the user selects the hyperlink in the contents view to return to the Input Form, the Input Form should be displayed with the last valid data entered.
When you have finished,
1. Deploy your application to sapphire.msoe.edu.
2. zip your Eclipse src and WebContent folders (NOT the entire project folder) and submit it to Blackboard.