SE-2840 Web Application Development
Lab 1: Web page using HTML and CSS
Outcomes addressed
- Be able to write a web page using HTML5 to provide structure/content.
- Be able to use CSS to specify presentation and appearance to the page.
Assignment
Preliminary
Before beginning the development work described below, install the latest updates to
Chrome and Firefox. Also, install JetBrains
Webstorm - it makes developing and debugging HTML,CSS, and Javascript code much
easier. The links for all of these downloads can be found on the main course
webpage.
Development work
Using the above tools, create and validate a simple web page consisting of three files - an .html file, a .css
file, and an image file (.jpg or similar): Replicate your own personal course schedule for the
current
quarter, making it similar in appearance the schedule shown below in Figure 2. Note that
you cannot just copy your instructor's schedule page and modify it for this
assignment, since that page was created with Microsoft Expression Editor, which generates truly
awful (and ancient) HTML markup that does not conform to modern HTML5.
You are to do this in two steps:
Part 1: HTML content (demo due by end of W1 lab)
First, create an .html file and add the html markup for your individual
schedule. You'll have to make use of header, paragraph, link, image, and table
elements. See the HTML
Reference for syntax details. When you display this page in a browser, it
will not have any style information (yet), so it will probably look like Figure
1 below - but you'll be adding the styling information in Part 2.
Use the
HTML Validator to make sure your markup
does not contain any errors (warnings are undesireable, but ok).
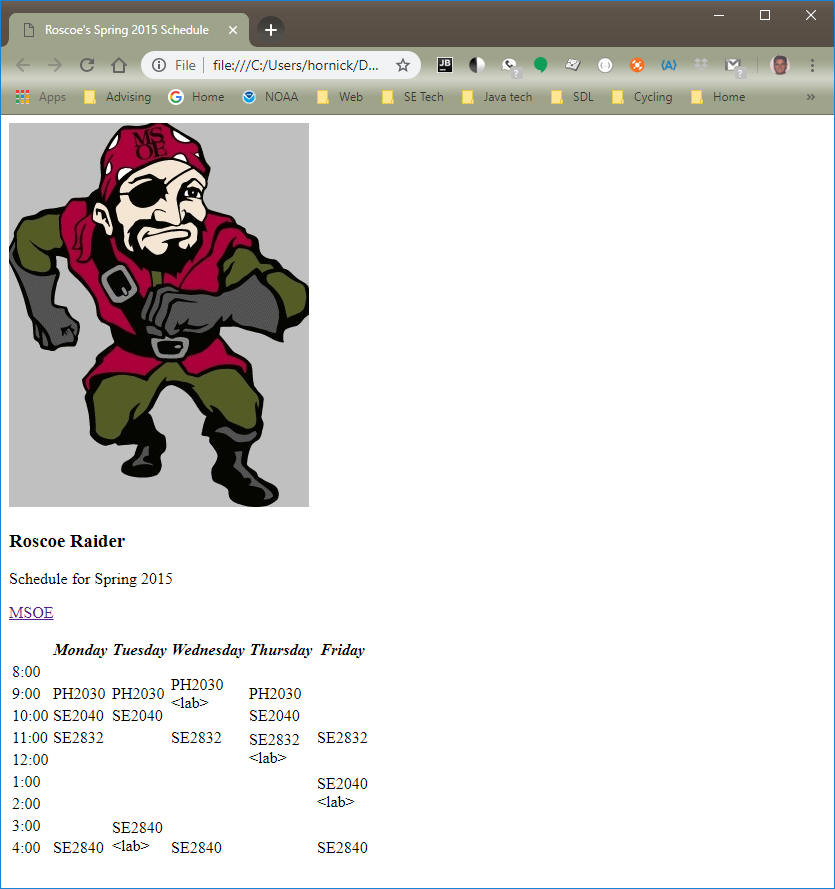
Figure 1. Web page with no CSS style rules applied.
Part 2: CSS styling
Once you have an .html file with the necessary content, create a .css file
containing style rules to make your page look the way it should (for both screen
and print output). Consult the
CSS Reference for this
part.
Note: Do not add css styling rules to your .html file; however,
you'll need to add a link to the .html file indicating the .css file to be used
for styling. Note also that you'll have to go back to the .html
file and add id or
class attributes to the
various html elements in order to associate a particular style (e.g. color or
font) with that element.
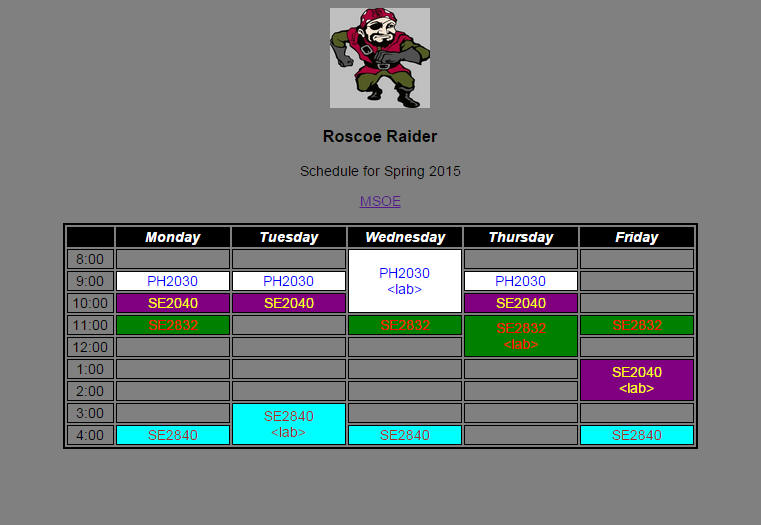
Figure 2. Completed web page with CSS styling applied. Note that everything
remains centered as the browser window is resized, and that the table
automatically resizes itself to fit within the window.
Testing and Validating
When testing, be sure to reset your browser's default color and font settings
to something that will make it easy for you to detect errors in your page. For
example, set the font to 36pt "Comic Sans" and the background color to yellow.
Note:
default browser fonts and colors are most easily set in Firefox (Chrome requires
extensions). In Firefox, settings for fonts and colors can be changed from the
Content tab of the Options dialog. Be sure to test in multiple browsers!
When testing Print...preview, make sure you select a
printer that supports colors (such as Cute PDF Writer). This is because some
printer drivers "know" that a particular printer can only print black and white
(even if the document contains colors), and will thus automatically display the
preview in B/W. ALSO, some printer drivers have a "Print Background Graphics"
option that you can select or deselect - make sure this option is SELECTED, so
that the driver does not automatically disable the display of background colors.
Acceptance Criteria
Your completed web page must conform to the following requirements:
- your final .css and .html files must pass validation with
no errors (warnings are undesirable but ok) using the
html validator and
css validator websites.
- your .html and .css files must all contain either an html or css comment
containing your name.
- the .html file must contain only structural markup; don't embed any css
rules in the .html file
- the .html file must refer to external .css files containing all the
style rules
- all text is to be centered, as shown above.
- when displayed in your browser screen, the page body must use Arial
font, not your browser's default font.
- you must specify a custom color for your page body background and
text. Any color is OK - just don't use the default browser
background color and text color.
- the generated page must contain at least one image (similar to
above, but it can appear anywhere, not to exceed 200x200 pixels).
- the page must make use of a table, with different borders for the cells
vs the entire table.
- the first column of cells of the table should occupy 10% of the
table width; the remaining 5 columns should each occupy 15% of
the table; the table itself should be centered within the page body
and occupy 85% of the page body width. Thus, as you change the size of
your browser, the table and cells should dynamically resize, and everything
should remain centered.
- your name should be a level-3 header (thus larger than all
other text).
- the "MSOE" text should be a link to www.msoe.edu.
- the headers in the table should have a black background with a white text color,
bolded and italicized, similar to above.
- your courses should each use a different background color with
a different contrasting text color, similar to above (choose you own colors
- don't use the colors you specified according to requirement 7 above).
- unused table cells can assume the background color of the page body.
- courses that span multiple cells (like labs, as shown above) must
be merged.
- lab sections must contain the "<lab>" descriptor - with "<" and
">" marks - under the course name.
- the title of the page (that appears on the browser tab) must contain
your name.
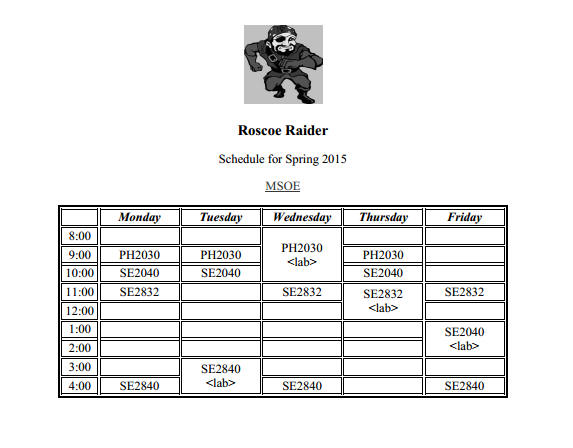
- when printed (or viewed in Print... preview of the browser, as shown
below) all text must be
black, the page background must be white, and the table cells must be either
white or shades of grey (use a media selector in your css
file to specify different rules for printing to screen vs. printers. Note: it's ok if the link and the image still appear colored in
print mode (challenge: figure out how to make the image gray-scale).
- when displayed in print mode, use Times New Roman font - not the
browser's default font.
Lab Submission (due date on course
syllabus page)
Follow these instructions
to complete your assignment:
- Put your name, using appropriate comments, in both the .html and .css
files.
- Submit your .html, .css, and image
files to Blackboard (Lab 1).
Be sure to keep copies of all your files, in case something gets lost.
Your grade will be based on the following criteria:
- Required content (looks/behaves/implements the requirements as stated above in the
numbered list). 5 pts off for each criterion not
satisfied!
- Timeliness of submission as stated in the
course policies.