In this assignment, you will create and deploy a simple web application to verify that your development environment is functional.
To begin, create a new Dynamic Web Application project in J2EE Eclipse named - this is important - <yourname>-Lab6. Your name is important in order to distinguish your web application from others when they are all deployed to the remote sapphire.msoe.edu linux server.
Your web application consists of a default static web page (which must be named index.html) that contains hyperlinks that allow the user to navigate to three other pages:
Note: The dynamically-generated html page may reference static .css and .js files that you store in your project's WebContent folder.
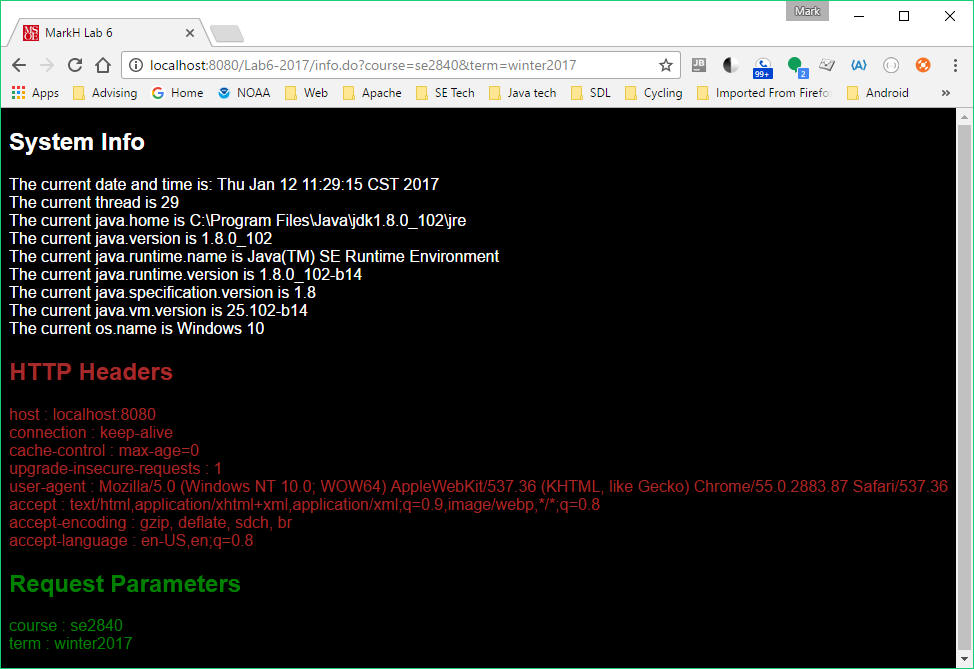
Your Servlet (whose class name must be InfoServlet, but whose and url must be info.do) must produce output similar to the following, where (using CSS or Bootstrap):
 | A System Info section that reports information about the server's environment (see the regular old Java System and Thread classes) |
| An HTTP Headers section appearing an alternate color, that displays information about the HTTP headers in the request coming from the browser. The number of header elements varies according to the browser being used. |
| A Request Parameters section in and alternate color, which echoes every request parameter supplied in the url. Note that there may be 0 or many of these. |
Read the Javadoc on the HttpServlet, HttpServletRequest, and HttpServletResponse classes to figure out how to output the HTTP headers and HTTP parameters.
When you have finished,
1. zip your Eclipse src and WebContent folders (NOT the entire project folder) and submit it to Blackboard.
2. Deploy your application to the sapphire server via this
Tomcat Web Manager
Application link.
Note1: When prompted for a username and password,
enter "tomcat" for both. This application uses Tomcat-based security, which
you'll learn about later in this course.
Note2: you need to either use a VPN or be on-campus to be
allowed to access the sapphire server over the network). At the bottom of the
Tomcat Web Manager page, you'll see a Deploy section with two forms (Deploy
Directory... and WAR file to deploy). Use the War file to deploy
form to browse to the location on your local PC filesystem where you created the
.war file containing your web application. Note: You create the .war file from
within Eclipse by selecting your project and choosing the Export...
command from either the main File menu or the context-menu that appears
when you right-click on your project.
Be prepared to demonstrate your application running both locally on your laptop as well as on sapphire, using the code you submitted.