In this assignment, you will modify your BusTracker application (from Lab 6):
1) You will modify your Bus Tracker server to implement a new route - /BusSpeed - that retrieves bus data from a Mongo database in response to an Ajax HTTP Get request, returning this data (a collection of speed information for different busses) as a JSON string. Item 3 below describes how this database is initially created.
2) You will modify your BusTracker.html and BusTracker.js web page to include a new feature: the ability to retrieve information (via an Ajax call to the /BusSpeed url) from the BusTracker database and display the busses that exceed a specified speed limit in the table and on the map.
3) Your MongoDB BusTracker database will be populated when you run your copy of mongoBusDataCollector, which is available on the course website. You will have to make a simple modification to this application to capture the data for your assigned route. You can start and stop this application as often as you wish, and run it for as long as you wish - just make sure you run this application for AT LEAST an hour total, split up around different time periods (rush hours, lunch hour, midday).
Do not bother to capture data between midnight and 5am, since it's unlikely that there are many busses running then.
The application captures data every 15s - meaning you should have AT LEAST 240 entries in your BusTracker database. You may have more, but you may not have less (point penalty applies). However, don't go overboard - you don't want a database that is so large that it consumes all the memory/filespace on your laptop.
In your NodeJS-based Bus Tracker server code, keep all existing routes and functionality, and add a new /BusSpeed route. In that section of code, base your implementation on the sample code from the /all route of mongoPhoneServer.js on the course website. Apply a find() filter to only return the busses that exceed a specified speed (provided as a parameter to the /BusSpeed HTTP GET request).
Be sure to use NPM to install all necessary modules, including mongoose, to your project.
In BusTracker.html, retain all existing functionality, modify the Route button to display Route/Speed, and add a new Report button that invokes a "generateReport" method when pressed. In the generateReport method, read the value that is in the Route/Speed text field. (Note: You may add a second separate Speed input field if you wish if you don't like using the same input field for both route and speed specification). Supply this value - now representing a speed value (in MPH) as a parameter to an Ajax GET request to the /BusSpeed route of your Bus Tracker server, where your server interprets the value as a speed (rather than a route number) and returns a collection of all busses exceeding that speed. This collection may be empty (if your speed threshold is high) or quite large (if the speed threshold is low).
Output this collection to the table, as in Lab 6. Since your table may be large, make sure that it's scrollable.
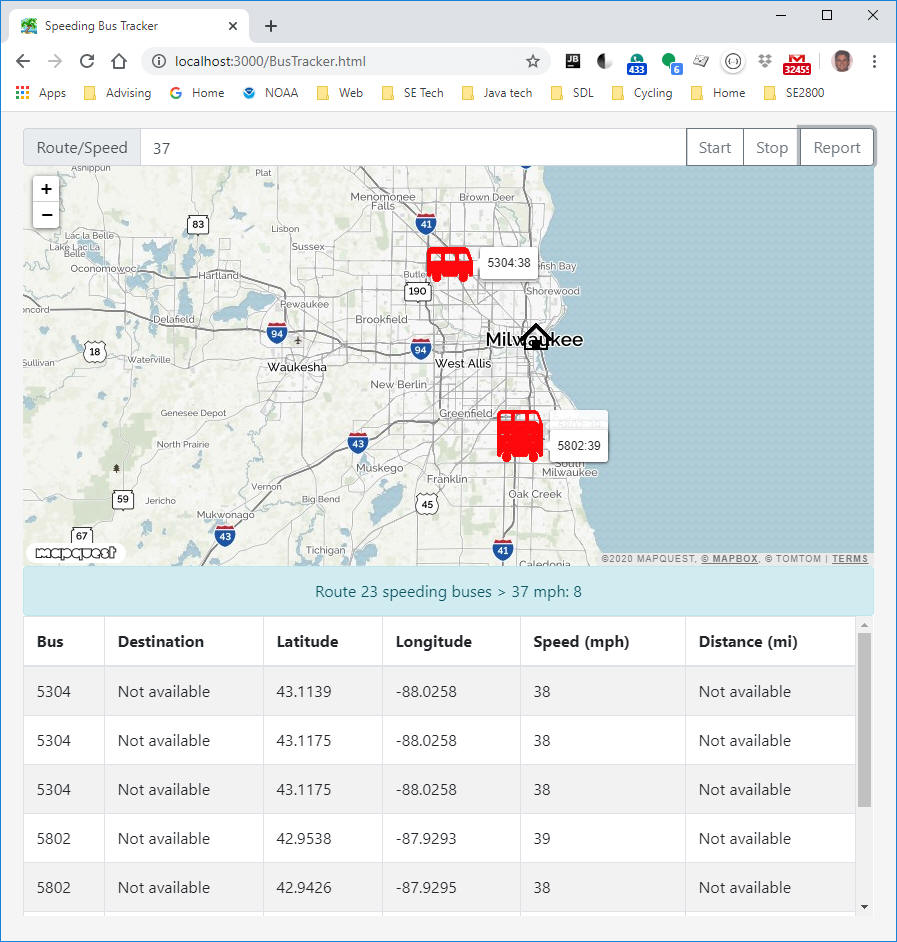
For the map: you will add a marker on the map for each bus (the number of markers is the same as the number of rows in your table). The map is static in this case, and does not need to be updated at regular intervals. Change the indicators on the marker to display the vehicle id and speed together (for example: 5516:47MPH). When you hover or click, the time should be displayed.
In the message field, indicate how many busses are contained in the table (and shown as markers on the map).
The screen below illustrates what the output should look like in general when the report button is pressed (in this example, the busses on route 23 have been monitored by MongoBusDataCollector, and those busses exceeding 37MPH are displayed). Custom icons are used in this example to dipslay the bus locations.
Note that the "distance" field cannot be populated from the information that was stored in the Mongo database - it thus appears here as "not available". You can choose to display the time instead.
Review your graded work from Lab 6 to eliminate errors you may have had in that submission.
Your grade will be based on the following: