This experiment consists of six parts. The objective of the first four parts is to familiarize you with the various tools you will be using in this course. The objective of the last three parts is to illustrate non-ideal behavior in common digital integrated circuits (IC's). You should complete the first four parts and one or more of the last three parts. Discuss the results of parts you don't do with somebody that did them.
You are to work in pairs on this experiment. Complete the answer sheet at the end of this handout and turn it in at the end of the laboratory period. Write everything you do and observe in your notebook. Your notebook should be sufficiently detailed and complete that someone else could repeat your work and reproduce your results. All significant data and observations must be recorded in your notebook. Information only must appear in at least one of the two group members' notebooks. A reference to it should appear in the other member's notebook. For example, the statement "See Jane Engineer's notebook for voltage data" might appear in Jane's partner's notebook.
You may perform experiments not listed in the handouts. However, you must first discuss them with the instructor and have a clear objective and expected result in mind.
Check-out the following equipment from the Technical Support Center at the beginning of the period.
| 1 | Digi Designer |
| 1 set | Wires (should come with Digi Designer) |
| 1 | Logic Probe |
| 1 | Logic Pulser |
| 1 set | Alligator clips |
| 1 set | Assorted 74x04 chips (such as 74L04, 74H04 and 74LS04) |
Read all the instructions for each part before starting on it. Complete the corresponding section of the answer sheet before moving on to the next part. Don't forget to connect the power and ground to all your chips and to turn on the Digi Designer.
Don't insert chips in the extreme right side of the bread boards. These areas of the boards are used most and sometimes wear out. If you find a breadboard with bad connections (or any other equipment problems) report them to your instructor or the Technical Support Center.
Use the chop (as opposed to to the alt) mode when comparing timing relationships between two or more wave forms.
Build your major projects on Circuit Designers so that they can be kept overnight.
The digital TEK 2245 oscilloscopes in the laboratory can be used to make a variety of measurements. However, you must understand their basic structure and functions to avoid confusion.
The 2245's are digital oscilloscopes. Some controls may not work quite as you expect. I have noticed a slight delay in the response to changes in some settings.
Not all laboratories are equipped 2245's. If the laboratory you are working is not, try to figure out how to for perform these following adjustments with whichever oscilloscope you have.
|
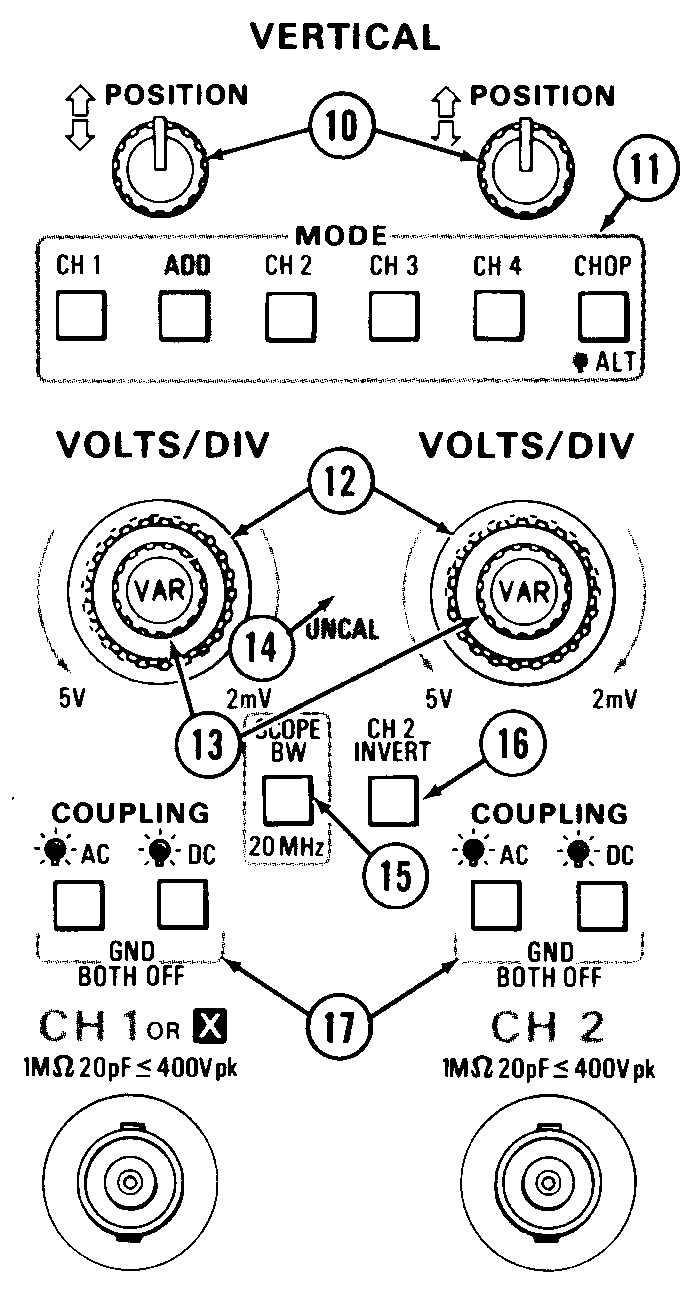
| Figure 1: TEK 2245A Vertical Controls (from the TEK 2245A Operator's Manual). |
The vertical controls are shown in Figure 1. These controls govern the appearance of the vertical or Y-axis of the oscilloscope. The 2245A's have 4 vertical channels, but have independent controls for only two of them. Only 2 channels will be used in most EE-290 experiments.
At the top of the vertical panel are the position adjustments. Use them to move the respective traces vertically on the display. To locate zero volts after making position adjustments switch off both coupling modes (AC and DC) to ground the input.
The vertical mode settings govern which channels are displayed and how they are displayed. You will generally be using CH1 and CH2 in EE-290 experiments. The ADD vertical mode displays the algebraic sum of CH1 and CH2. The CHOP mode switches between the selected channels at about 675 kHz. The choice of ALT (alternate) or CHOP generally makes little difference in the appearance of the display.
The VOLTS/DIV selects of the
volts/division scale of the respective
channels. The volts/division values are displayed on the screen.
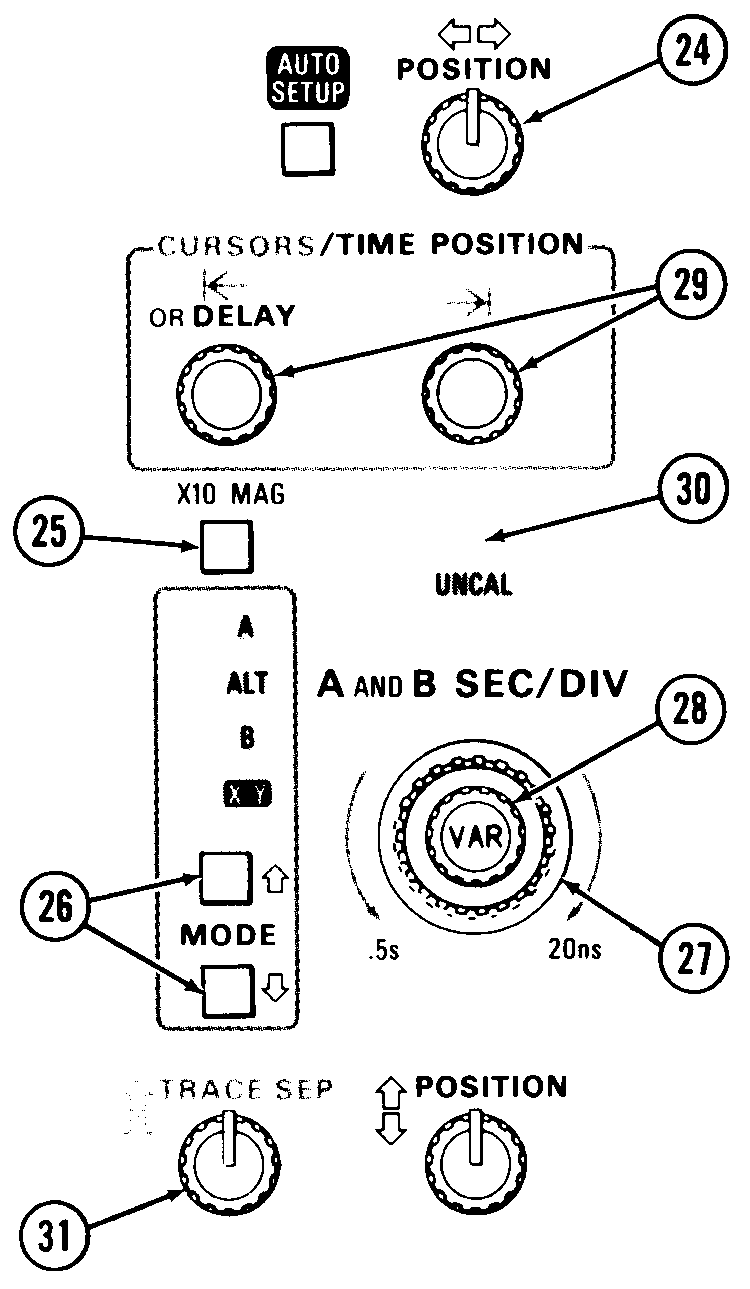 |
| Figure 2: TEK 2245A Horizontal Controls (from the TEK 2245A Operator's Manual). |
The horizontal controls are shown in Figure 2. The AUTO SETUP button causes the oscilloscope to attempt to set itself up. After pressing AUTO SETUP you will generally get some type of display. Even if its not exactly what you wanted, this display can be used as starting point for further adjustments.
Use the CURSORS/TIME POSITION knobs to make measurements on the display. First press one of the three MEASUREMENTS (VOLTS, 1/TIME or TIME) buttons to enter the corresponding measurement mode. Voltage measurements are generally made with respect to the CH1 scale if both CH1 and CH2 are being displayed. The scale and basis of the 1/TIME and TIME measurements are more complex. See the manufacture's user manuals for details.
The 2245A's can sweep horizontally at two
different rates at once. As a result, these
oscilloscope have two time bases (A and B).
This feature will generally not be used in
EE-290. Use only horizontal modes A and
X-Y. In mode A, the A and B SEC/DIV
knob changes the horizontal sweep rate. The
rate is display on the screen. In mode X-Y, the signal applied to CH1 produces the X
deflection while the signal applied to channel selected by the vertical mode produces the Y
deflection. The X-Y mode allows you to produce X-Y type graphs directly on the oscilloscope
screen.
 |
| Figure 3: TEK 2245A Trigger Controls (from the TEK 2245A Operator's Manual). |
The trigger controls are shown in figure 3.
The two time bases can be triggered in
different ways. Generally, leave the trigger
mode on AUTO LEVEL for A and B.
Select the SOURCE for triggering based on
the channel that provides the bast results. It
is sometimes necessary to select the LINE
source when you ground the inputs by not
selecting either type of coupling. Generally
leave the trigger CPLG (coupling) on DC or
AC depending on the type of signal you are
triggering on.
Connect the red and black alligator chips on the logic probe to the red and black power posts on the Digi Designer.
Prove the following assertions:
Prove the following assertions:
Connect the red and black leads from the logic pulser to the corresponding posts on the Digi Designer. Use an alligator clip to connect the pulser output to the input on an inverter. Set the pulser on 500 Hz. Connect the output from the pulser to CH1 on the oscilloscope. Connect the output from the inverter to CH2 on the oscilloscope. Press the AUTO SETUP button on the oscilloscope and make any adjustments needed to get a display of the two output signals.
The pulse shape may depend on weather or not the pulse is connected to a TTL load (input).
Set up the signal generator to produce a 0 to 5 volt, 1.00 kHz triangle wave. Connect the output of the signal generator to CH1 of the oscilloscope. Push in the following buttons on the signal generator: x1k, /\/ (triangle wave) and DC. Adjust the frequency knob on the signal generator until its frequency is 1.00 kHz. Press the AUTO SETUP button on the oscilloscope and make any needed adjustments to get a display of the signal generator output. Finally, adjust the +/- Offset and Amplitude knobs on the signal generator to produce the desired 0 to 5 volt, 1.00 kHz triangle wave.
Leave the signal generator output connected to CH1 and also connect the signal generator output to the input of an inverter. Connect the output of the inverter to CH2. Now make the follow settings on the oscilloscope to produce an X-Y plot of the inverter input and output voltages: Vertical Mode - CH2 (only) and Horizontal Mode - X-Y. Make any other adjustment needed to provide useful results.
Vary the frequency of the signal generator and note the effect on the voltages.
Turn off the signal generator and Digi Designer and replace the IC with one of a different type. Repeat your observations.
Connect the six inverters in one of your 7404 IC's in series (so the output of one provides the input to the next). Use the logic probe, logic pulser and/or Digi Designer clock to assure your circuit is working.
Set the signal generator to produce a 0 to 5 volt, 1 MHz square wave. This step will involve using the oscilloscope.
Connect the output from the signal generator to the input of the first inverter in the series. Connect the output of the last inverter in the series to the oscilloscope.
Display the two signals (signal generator output and last inverter output) together on the oscilloscope. Observe the timing relationship between the two signals.
Turn off the power to the Digi Designer and the signal generator and replace the IC in your circuit with one of another type. Repeat you measurements for each type of IC.
Measure the effect internal (Norton) resistance of a gate. First, measure the open circuit output voltage for a given input voltage (ground works well for an inverter by providing a high output). Assume the input resistance of the oscilloscope is infinite. Next, connect a series of resistors between the output and ground. Measure the output voltage and calculate the output current for each resistor. Be careful not to exceed the chips rated output current.
Plot the output current (on the horizontal axis) versus the open circuit voltage minus the output voltage (on the vertical axis). The slope of this plot is the internal resistance of the gate. The internal resistance may be a function of the output current.