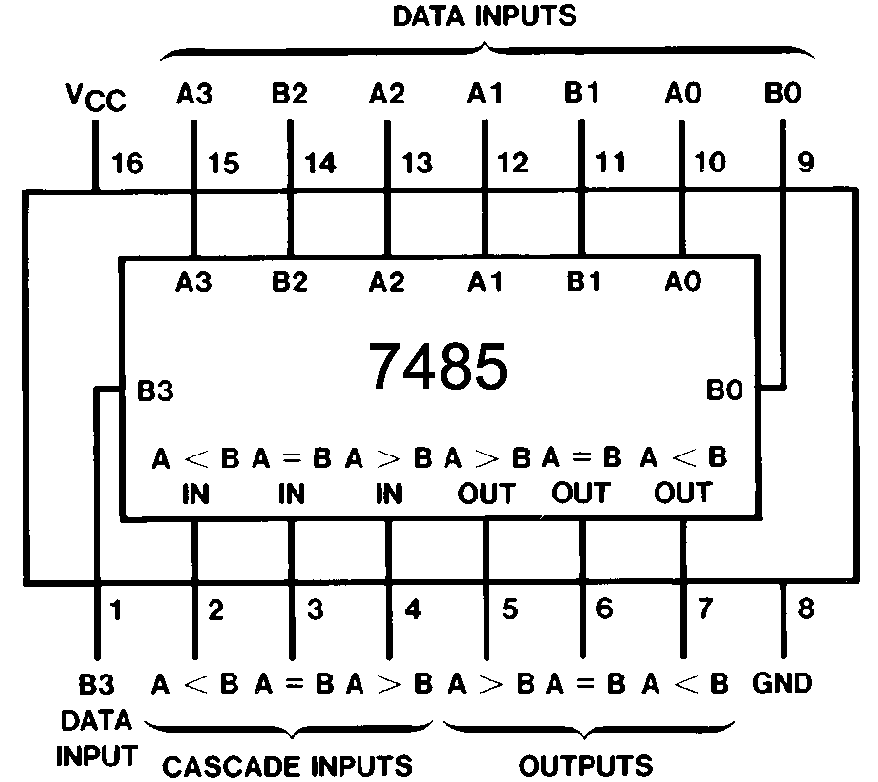
In this exercise you will perform binary mathematics in hardware. You will use a 7485 comparator chip and a 75283 adder chip. The pin outs for these chips are shown in Figure 1.
|
|
| Figure 1 -- Pin outs for the 7485 comparator and 75283 adder chips. | |
Dangerous line voltages are present at the outlets on your work bench. Do not inert anything other than approved power plugs into these outlets.
The voltages and currents produced by the Digi Designer are generally safe. However, you should not short +5V (Vcc) or logic High outputs directly to ground or intentionally make yourself part of a logic circuit.
Chip pins and the tips of the small wires may be sharp. Handle with care. Chips can become very hot if wired incorrectly. Be careful.
A comparator compares the magnitude of two binary values. The 7485 is a 4-bit comparator meaning that it compares two 4-bit values. You will use the Digi Designer switches to enter one of these values (called A). You will "hard wire" the other value (called B) into your circuit. You will use the value of 01012 (= 510) for B. You will use three Monitor Lights on your Digi Designer to display the result of the comparison. Possible results are A < B, A = B and A > B.
Insert your 7485 into the bread board on your Digi Designer. Connect power and ground to pins 16 and 8, respectively. Make the following connections from left to right across the lower edge of the chip:
| Pin | Function | Connection |
|---|---|---|
| 1 | B3 input | Ground, logic Zero |
| 2 | A < B cascade input | Ground, logic False |
| 3 | A = B cascade input | +5V, logic True |
| 4 | A > B cascade input | Ground, logic False |
| 5 | A > B output | J1, lamp monitor |
| 6 | A = B output | J2, lamp monitor |
| 7 | A < B output | J3, lamp monitor |
Make the following connections from right to left across the upper edge of the chip:
| Pin | Function | Connection |
|---|---|---|
| 9 | B0 input | +5V, logic One |
| 10 | A0 input | J18, switch |
| 11 | B1 input | Ground, logic Zero |
| 12 | A1 input | J17, switch |
| 13 | A2 input | J16, switch |
| 14 | B2 input | +5V, logic One |
| 15 | A3 input | J15, switch |
Test your circuit for all possible values of A (i.e., all possible combinations of A0 through A3) and complete the table in your work sheet. Remove all the wires and the 7485 from your Digi Designer.
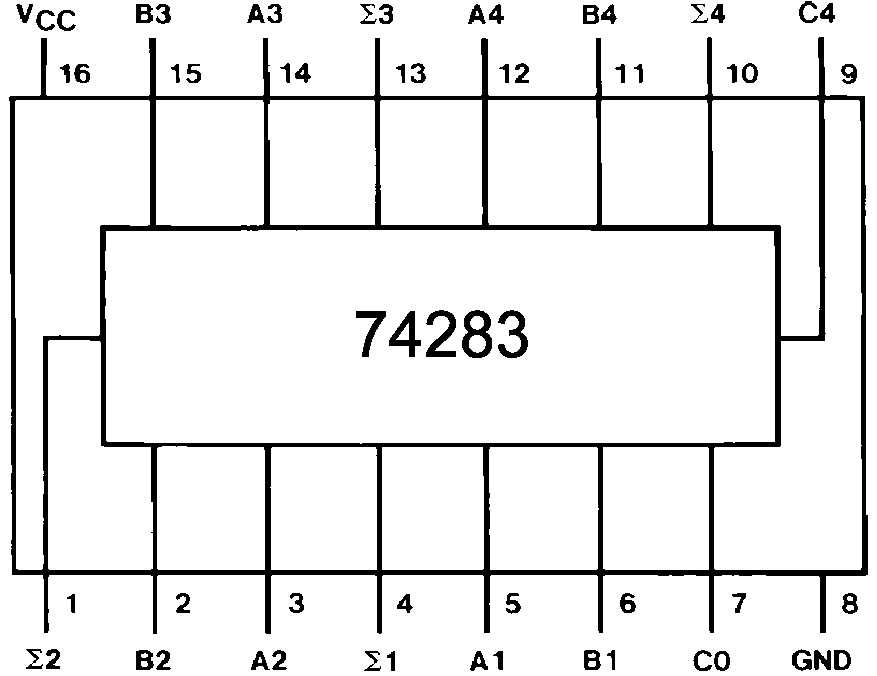
Next you'll use a 74283 adder chip to add two 4-bit binary numbers. The two values to be added will be called A and B and consist of bits A0 through A3 and B0 through B3, respectively. You will use the switches on your Digi Designer to generate A and will hard wire B = 01012 = 510. The output of the adder will be called Sigma and consist of bits Sigma0 to Sigma3. The 74283 also has a carry input called C0 and a carry output called C4. You will ground the carry input and use the DMM to monitor the carry output.
Insert your 74283 into the bread board on your Digi Designer. Connect power and ground to pins 16 and 8, respectively. Turn on the DMM and connect the black lead to the GND terminal on your Digi Designer with an alligator clip. Make the following connections from left to right across the lower edge of the chip:
| Pin | Function | Connection |
|---|---|---|
| 1 | Sigma2 output | J3, lamp monitor |
| 2 | B2 input | Ground, logic Zero |
| 3 | A2 input | J17, switch |
| 4 | Sigma1 output | J4, lamp monitor |
| 5 | A1 input | J18, switch |
| 6 | B1 input | +5V, logic One |
| 7 | C0 input | Ground, logic Zero |
Make the following connections from right to left across the upper edge of the chip:
| Pin | Function | Connection |
|---|---|---|
| 9 | C4 output | Red DMM lead (via a wire to an alligator clip) |
| 10 | Sigma4 output | J1, lamp monitor |
| 11 | B4 input | Ground, logic Zero |
| 12 | A4 input | J15, switch |
| 13 | Sigma3 output | J2, lamp monitor |
| 14 | A3 input | J16, switch |
| 15 | B3 input | +5V, logic One |
Test your circuit for all possible values of A (i.e., all possible combinations of A1 through A4) and complete the table in your work sheet. Remove all the wires and the 74283 from your Digi Designer. Turn off your DMM.
Chip pin out diagrams in this document were taken from Fairchild/National Instruments chip data sheets.