This is an old version of this course, from Fall 2015. A newer version is available here.
Introduction
In this lab, you will send UDP messages between machines. You will also predict the contents of the UDP message and compare it with the UDP message captured with Wireshark. You will write a report for this lab, and submit it electronically by PDF.
Work this lab in teams of two, unless different size is approved by the instructor.
Prelab
You should have Python 2 and PyCharm (or your preferred IDE) installed.
Sending and Receiving UDP Messages in Python
Select one of your team members laptops to function as the server, and another machine to function as the client.
Student running client:
Download udpclient.py, a program that sends a UDP message. In the __author__ string, replace Phileus Fogg with your name.
In the file, replace the string server_name with the IP address of the machine you are sending the packet to (that is, the server's IP). You can find the IP address using the Windows command ipconfig. Be sure to use the IP address associated with the interface that you plan to use. For example, if you will send the packet through wireless, use the IP address listed under Wireless LAN adapter Wireless Network Connection.
Run the client program. If the server is not running, the message will simply be dropped by the server machine. This code sends a UDP message, supplied by the user, to port 12000 on the server side.
Student running server:
Download udpserver.py. This is a very simple program that receives a UDP message. It's called a server because it will wait around for the client to ask it something. Run the server, e.g. in PyCharm. This program will remain running until it receives a UDP message. Change the server_name to the IP address of your computer. Have your partern run the client to send you a UDP message. When the message is received, the server reads the first byte to determine the number of application payload bytes. Then it displays each payload byte in hex.
Predicting the Contents of a UDP packet
On p. 202 of the text (Figure 3.7), you will find a figure illustrating the header of a UDP packet. The source port and destination port fields give the port numbers of the programs on the sender and receiver, respectively. The length field specifies the length of the entire UDP packet in bytes, including both the UDP header and the payload. (It does not include the length of the lower-level headers, such as IP, and Ethernet.) Note that Python encodes strings in ASCII, and that '\x03' is a single byte with value 03 in hex.
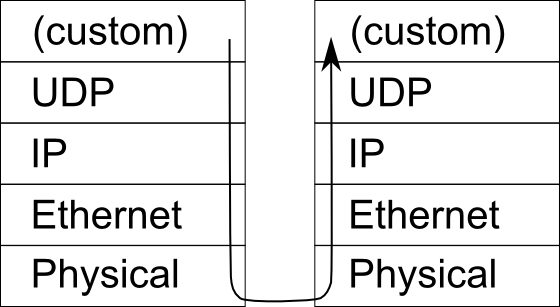
The UDP message is sent in a way similar to the envelope skit on the first day of class. Instead of HTTP at the application layer, we have a very simple application protocol that uses the first byte to indicate the number of payload bytes, and the payload bytes follow. Instead of TCP, we have UDP. While TCP breakes a message into parts, UDP can only send a single (smaller) packet at a time. All UDP adds over IP is the ability to specify a port. The port specifies which program should listen to the message. How does the server know which program should listen to the message? When the program starts, it binds to that port. Then, when the server receives a UDP message, it looks up which program is bound to that port and delivers the message to that program.
You do not need to predict the contents of the checksum or the source port. Feel free to use tools to convert to hexadecimal from decimal. Try to do the ASCII conversions by hand.
In your report, include your prediction for the contents of all of the bytes in the UDP header and data. Do not include the lower-level IP and Ethernet headers. (You can put in zeros for the checksum and source port fields.). For example, you might predict the bytes to be e1 15 e1 15 34 46 54 3b 6d e1 35 02 61 62 ..., and find the actual bytes to be e1 15 e1 10 34 00 54 3b 00 01 02 6d e1 35 02 61 62 ... (This example isn't a real UDP packet — it just shows the format I want you to use for displaying your predictions). Describe any challenges you overcame while predicting the packet size. Show your prediction to the instructor.
Report title information
(New section)
On the first page of your PDF, include: The lab number (Lab 2), a title for the assignment, the date, the course (CS2910), and your names. You do not need a separate title page. This information can be included on the same page as the rest of your report if that works well for you.
Introduction
(New section)
Describe in one sentence (or more) what this lab is about
Capturing the UDP Packet
Turn on Wireshark, and start capturing. Be sure to capture on the interface that you are using to send the packet. For example, if you are sending the packet through wireless, capture on the wireless interface. The Wireshark filter udp.port == 12000 may help you to find the packet. You can save your captured packets using File->Export Specified Packets. (You must stop capture with the red square before you can save any packets this way.)
In your report, include the contents of all the bytes in the actual captured packet, in hexadecimal just like your predictions (e.g., for a 5-byte message, the actual contents might also be 01 ce 89 01 3c). Describe and explain any differences between the actual packet and what you predicted.
Conclusions
In the conclusions section of the report, each team member will write a paragraph describing what they (individually) learned in this lab. So a team of two students will have two paragraphs in the conclusions section. The rest of the report can be written together.
Just for fun
This part of the exercise is more difficult than the remainder of the exercises. It is purely optional.
Predict the entire contents of the packet by setting the source port of the packet, and prediting the value of the checksum.
Normally, when you send a UDP packet, you do not need to specify a source port — the machine will automatically pick an arbitrary one for you. However, you can if you want to. Simply bind the client to a port on the local machine before sending the packet. In this way, you can specify what the UDP packet will be in its entirety.
The checksum is the one's complement of the one's complement sum of all the 16-bit words (pairs of bytes) in the message. When adding numbers in one's complement, you need to carry any overflow around and add it back in the one's place. (This is a result of the difference of one the one's complement encoding and the two's complement encoding of a negative number.) See details in the text on p. 203 or ask your instructor for details.
Or, if you can predict all the contents of the packet, try constructing the packet and sending it in raw mode. Just make sure your program only sends one packet — in case there is something VERY wrong with it...
Submission Instructions for Dr. Yoder
Submission (Due Week 2, Friday, 11pm)
Submit your lab electronically before the deadline listed above. The filename of the PDF does not need to match.