This assignment is a team assignment. Please work in teams of two unless approved by the instructor.
Equipment Needed
- The lab checklist. I will provide a printout of this.
- From the BeagleBone kit you purchased:
- Your BeagleBone black
- 5 V power supply (probably good to get in the habit of using this)
- From the SE3910 Kit (Check out from Tech Support)
- USB Oscilloscope (Digilent Analog Discovery)
- Basic Proto Cape and the small breadboard (or, if available, BeagleBone Breadboard Cape)
- (optional) BeagleBone Breakout Board
- A few 1KΩ or 2.2 KΩ resistors (Use 1KΩ if 2.2 KΩ is not in kit)
- Two network cables, or more if you want to share
- (optional) NMap/zenmap installed on your computer to scan for the BeagleBone
- Your BeagleBone black
Some VM, Linux, and Networking Tips
- VM tips
- Use right-control to escape from the virtual machine.
- To open terminal in the VM: Applications->Accessories->Terminal
- From the browser, to copy the path, press Ctrl-L. The graphical folder crumbline will turn into a simple text editor.
- Linux equivalent of ipconfig:
/sbin/ifconfig, or, if the path is set up right,ifconfig. (I hear thatifconfig, if it works, may not give as complete results as/sbin/ifconfig. I haven't confirmed this yet.) - To get a summary of IP addresses:
- On windows with cygwin, use
ipconfig | grep "IPv4" - On linux, use
/sbin/ifconfig | grep 'inet addr'
- On windows with cygwin, use
- Finding the BeagleBone
- The program nmap (with graphical user interface zenmap) can be quite useful for finding the BeagleBone's IP address. To use it, you must know the subnet that the BeagleBone is on. nmap/zenmap can scan all the IP addresses on that subnet and find all computers that respond to ping.
- Or, you can log into the BeagleBone through the USB connection, and run the ifconfig command to find out what its other IP address is. Again, it is useful to have some idea what subnet the BeagleBone will be on. For the switches in lab, the subnet is usually 192.168.1.[xxx] (So the subnet mask is 255.255.255.0, the switch itself usually has an IP address of 192.168.1.1, and the devices that connect are often assigned addresses like 192.168.1.100, 192.168.1.101, etc.)
- More details: Connect to the Bone through Putty and USB to find its IP addresses. Then, from a windows command prompt, find the IP address of your laptop. The subnet of two of these should match. For example, on my system, the bone had one IP address that was 192.168.1.100, and my computer had an IP address that was 192.168.1.103. The switch is acting as a 192.168.1.X subnet DHCP server (It has a subnet mask of 255.255.255.0). When I turn on my virtual machine in bridging mode, it gets an IP of 192.168.1.104, so it virtually appears as another device on the same subnet.
- Another alternative is to manually set the bone's IP address using something like
ifconfig eth0 192.168.1.100 netmask 255.255.255.0, and your computer's address using the Windows GUI (e.g. to 192.168.1.101). You will also need to set your virtual machine's IP address — this is possible to do with the GUI (e.g. to 192.168.1.102). Then you can directly connect the BeagleBone to your computer. Of course, to access the BeagleBone in the first place, you will need either the USB cable, or one of the switches in the lab. But once this is set up, you should, in theory, be able to access your BeagleBone from your dorm room. - If you want to get by for now with just one cable, you can set up your laptop as a "switch" of sorts (that is, as a DHCP server), and plug the BeagleBone into it. Ask me for details. This approach has been somewhat flakey for me. In future labs, we will want to connect multiple bones, and having multiple ethernet cables will be important.
Prelab
Read through the Lab Procedure. Do what you can without the check-out hardware. This includes writing a network communication program in C, compiling it in your virtual machine (both regular and cross-compiled), and testing it either between two virtual machines, or between the BeagleBones, or some combination of these.
You may also wish to draw how you will wire your test circuits as part of the prelab. You can draw your circuits as they would appear on the Breadboard or BeagleBone Solderless Breadboard Cape. (The BeagleBone solderless breadboard cape is not available in every SE3910 check-out kit.)
Please demonstrate all your pre-lab accomplishments at the beginning of lab, and let me know any challenges you overcame in the process.
Cross Compiling with Eclipse
In this section, we compile a program using Eclipse rather than the command line. Many students find developing code in Eclipse to be more pleasant because of the syntax highlighting, error highlighting, etc. However, you are welcome to use the command line if you prefer.
We will also set up a remote connection to the Beaglebone through Eclipse. I am not sure whether this is actually more convenient or not. You may want to try it once, and then use whichever mode you prefer to deliver the code to the Beaglebone and execute it there.
Regardless which technique you use, be sure to compile the program and run it both on the VM and on the Beaglebone.
In the virtual machine, start eclipse under Linux using the command eclipse & from the console, or Development->Eclipse from the Applications menu. Select a workspace that you would like to use, e.g., with File->Switch Workspace->Other.... Ideally this will be in the shared folder that you can access from both Windows and Linux. Recall these appear on the VM in the /media folder. I use /media/sf_vmshare/workspace. In Eclipse, select "File->New->Project" and "New C Project". Enter a project name of "Lab4Test". Click on next until you get to the Cross GCC Command screen. Enter the compiler prefix arm-linux-gnueabihf- and the path /usr/bin, then click "Finish".
Add a new C file to the project (File->New->Source File), named test.c, and enter this code:
#include <stdio.h>
#include <stdlib.h>
#include <unistd.h>

int bss_var; 		/* This is an uninitialized global variable. */
int data_var = 1;	/* This is an initialized global variable. */
static int  lv;
static int lv2 = 1;

int main(int argc, char* argv[])
{
  void *stack_var; /* This is a local variable declared on the stack.*/

  char hostname[1024];  // This is an array declared Pon the stack which will hold the hostname.

  stack_var = (void*) main;

  printf("Hello World!  Main is executing at address %p\n", stack_var);
  printf("This address (%p) is in our stack frame\n", &stack_var);

  printf("The printf function is located at location %p.\n", printf);

  /* The bss section contains uninitialzed data. */
  printf("This address (%p) is our bss section\n", &bss_var);

  /* Data section contains initialized data */
  printf("This address (%p) is in our data section\n", &data_var);

  /* This is a static variable which is uninitialized. */
  printf("The address of the static variable which is uninitialized is %p.\n",  &lv);

  /* This is a static variable which is initialized. */
  printf("The address of an initialized lv variable is %p\n", &lv2);

  /* read the hostname. */
  gethostname(hostname, 1024);

  /* Print out the hostname to the console.*/
  printf("Hostname: %s\n", hostname);
  return 0;
}
Save and build the code (Project->Build All). It should build cleanly. Goto the Window -> Show View -> Other -> Remote Systems -> Remote Systems tool. This will open up the Remote Systems tab. Right click on "Local" and select "New -> Connection". Select "Linux" and configure the connection with the IP address or domain name of your beaglebone (e.g. 192.168.1.100) for both the "Host name," and the description. Remember that you cannot connect to your Beaglebone from the VM through the USB connection, so 192.168.7.2 will not work.
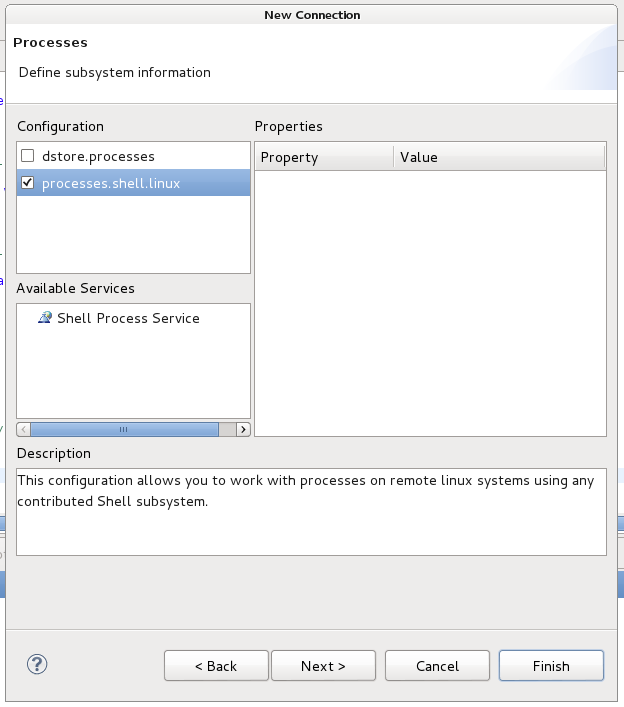
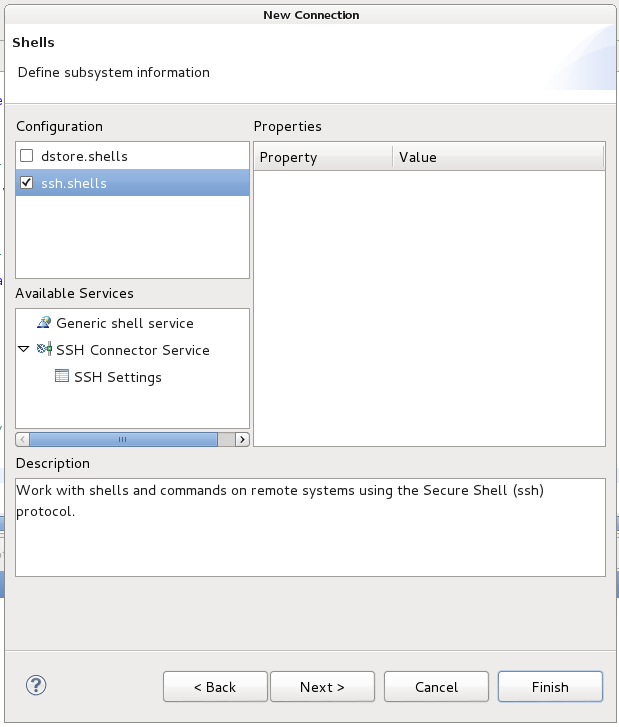
As you go through the remaining setup screens, set them up to match the images below:
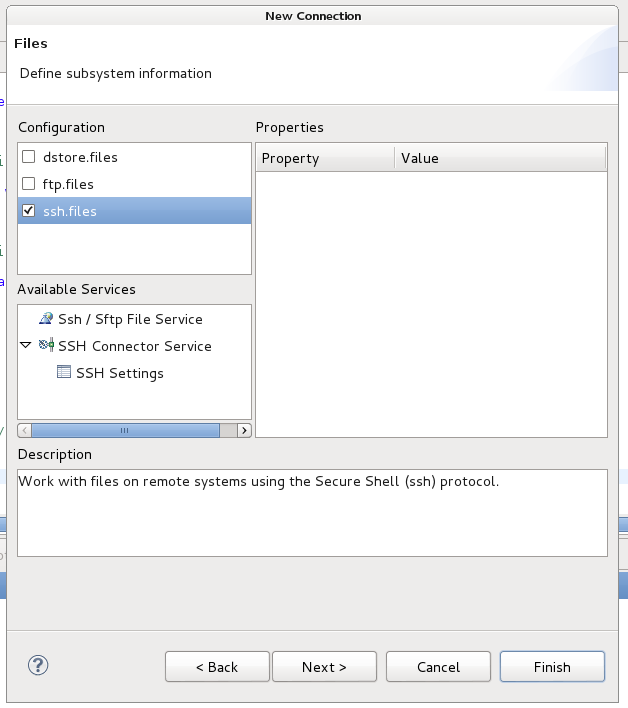
Right click on the line with the Linux penguin you just created for your Beaglebone and click connect. Enter root debiantemppwd as the password
With the connection made, select the built binary (Lab4Test->Binaries->Lab4Test, also available through Debug folder), right click, and select copy. Copy the binary to the remote machine (Under the remote machine, open Sftp Files, the My Home.) On the remote system, right click on ssh terminals on the beaglebone machine and "launch terminal". You should now be able to run the program on the remote machine. (Note: You may have to change permissions to allow you to execute the program. These were the permission commands talked about in operating systems. As a refresher, chmod u+x Lab4Test is probably what you need.)
When the program runs, record the various addresses for main, the stack, the bss section, and the data section. Also record the size of the executable file.
Compiling for the VM
Now in Eclipse right click on the project (Lab4Test under Project) and select properties. Select the Tool chain editor (You can find by typing "tool chain" in the the search box), and change the current toolchain to LinuxGCC and hit OK. This will cause Eclipse to build for your Linux virtual machine instead of the Beaglebone target. Go to Project -> Build all to build your source code. Then, right-click on Lab4Test->Binaries->Lab4Test go to Run As -> Local C/C++ Application and execute the program. Record the addresses for main, the stack, the bss section, and the data section. Also record the size of the executable file. Write how they are different from what you recorded for the Beaglebone Black.
Once you are done with this, set your environment back to use the Cross GCC. You can do this by going to the same properties dialog and reverting your changes: Under C/C++ Build->Tool Chain Editor, select Cross GCC, and under C/C++ Build->Settings, set the Prefix back to arm-linux-gnueabihf- and the Path back to /usr/bin.
Including libraries from Eclipse
If you need to link to a library for an Eclipse project, right click on the project and select Properties. Under C/C++ Build, select Settings. In the main window, under "Cross GCC Linker", select "Libraries." Add the library name here, without the lib prefix. For example, if you want to link against the pre-compiled library libm.m, only put m for the library name, not libm or libm.m. For a full example of a program using the math library, see the appendix. Similarly, to link against libpthread.m, put pthread rather than libpthread or libpthread.m
Measuring interrupt and network latency
In this part of the lab, you will create a system consisting of two Beaglebones connected by a network. When a button is pressed on the first BeagleBone, LEDs will light up on both the first and the second Beaglebone. The LEDs will turn on and off with several button-presses.
Source Code
As a team, split the two programs to be written between the two members of your team:
- Client. This program should create a TCP connection to the server. When a button is pressed, it should send a message to the server.
- Server. This program should accept a TCP connection from the client. When a message is received, based on the message received, it should turn an LED on or off.
For each program, the user should be able to specify as command-line arguments:
- How many button-presses the Beaglebone will respond to as a command-line argument. When run without arguments, the program should state whether this argument counts presses and releases together or separately. (In other words, if you accept an argument of 2, will the program respond to DOWN-UP and then be don, DOWN-UP-DOWN-UP and then done?)
- Which GPIO pin to use for input (or output)
- What IP address to connect to (for the client)
- What port to bind or connect to
- Anything else you find convenient
Create new C++ projects for the client and for the server. Both programs need to be written in C/C++ using the low-level Linux/C socket libraries.
Before you begin writing your programs, agree on a simple protocol that the two programs will use to indicate if the LEDs should be turned on or off. Both the server and client should exit cleanly once the agreed-upon number of iterations has been reached.
To test the programs before you get into lab, the client program should have a testing mode that sends the messages for button-down and button-up whenever the user presses ENTER. The server code should print out debug messages when it changes the state of the LED.
In writing the code for the client and server, these simple client.c and server.c files could be useful.
There are a few issues that come up when translating this code to C++. Please try to resolve the errors as they arise and ask your instructor if you have any questions.
As an example of responding to interrupts, see Derek Malloy's GPIO.h and GPIO.cpp, which provide a simple C interface to GPIO pins. Derek Malloy's GPIO needs to be linked against the pthread library (in the same way the short example links against the m library above.) This simple example demonstrating using it with interrupts: interrupt.cpp.
Wiring
When selecting GPIO ports, choose those in the range highlighted in the figure below. (Image compiled from images on ti.com and elinux.org)
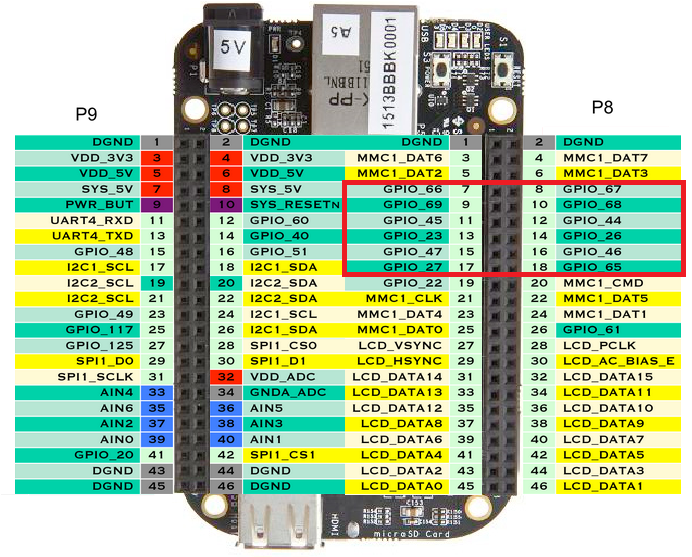
See last week's lab for the formula needed to convert the numbers on the basic proto cape to the export pin numbers.
Connect an input switch to a GPIO input port as illustrated in the schematic below: (You may use any resistor over 1kΩ in both these circuits)

Connect an output LED to a GPIO output port as illustrated in the schematic below:
Note that these circuits are separate circuits — they don't share anything in common except the connection to digital ground.

Measure these signals:
- The button press
- A local GPIO port written right after the button press
- A remote GPIO port written right after the receive on the remote client
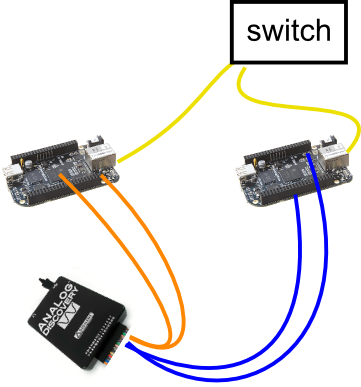
You will only be able to measure two signals at any given time. To measure both the button press and the remote GPIO port, you can wire up the system something like the figure below:
Determine the delay due to the interrupt response, and the delay due to sending a message over the network
On your printouts, clearly mark what each signal is. Is this the button-press, the output on the first BeagleBone, or the output on the second BeagleBone?
Staple the lab checklist to the top of your materials. Make sure the materials are in the order on the checklist. I will provide a printout of the checklist.
The deadline for the in-lab demo and lab packet is printed on the lab checklist.
No Excellent Credit This Week
You do not need to do any excellent credit activities this week.
Appendix: Compiling a project with dependencies
This section is purely optional.
In this appendix, we build an example program that serves as a calculator. This program requires some external libraries to be built successfully.
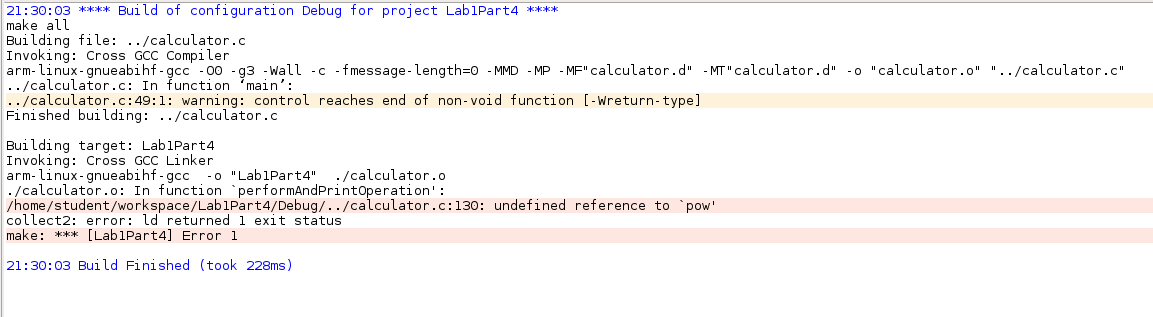
Create a new cross compiled C project called "Lab4Calculator" in Eclipse and download the tar file from the course website. Extract the source file calculator.c into the directory, and the source code should be included into your project (If it is not, manually create a new C file with any other name, and copy-paste the code from the calculator.c into this file. Delete any files that you don't want to later appear from your project folder.). Click on build and you should see the error messages shown in Figure 15. What kind of error is this message indicating?
To see the compile-time console output for a specific project, click on that project in the tab on the left.
Right click on the project and select Properties. Under C/C++ Build, select Settings. In the main window, under "Cross GCC Linker", select "Libraries. Add the "m" library. (As discussed in class, this will link against the pre-compiled library libm.m, but you only need to put "m" for the library name.) Rebuild the code and you should have a working calculator. Test the program on the BeagleBone using the techniques shown previously. Take a screen capture of your remote terminal session to the BeagleBone. (It's a litle flakey.)
Now that you have the program working on the BeagleBone, switch back to the command console and connect to the BeagleBone using the ssh command. (When not using putty, you should specify the username with @. For example: ssh root@192.168.1.100). Verify that you can start the program from a plain console independent of Eclipse.