This lab is in DRAFT form. Please discuss planned changes with me before beginning this lab.
This assignment is a team assignment. Please work in teams of two unless approved by the instructor.
Equipment Needed
- Your beaglebone black
- 5 V power supply (with LCD + sound card both drawing extra current, a good idea to use all the time in this lab.)
- SE3910 Kit (Checkout from Tech Support)
- USB audio I/O ports (for bone)
- USB hub (for bone)
- USB Oscilloscope (Digilent Analog Discovery)
- Beaglebone Breadboard Cape
- (optional) Beaglebone Breakout Board
- Logitech webcam
- Two male-to-male audio cables
- (possibly) A few 2 or 2.2 KΩ resistors (Checkout from me if not in kit)
- (optional) NMap especially zenmap
- Two network cables, or more if you want to share
Some VM and Linux Tips
VM
Use right-control to excape from the virtual machine.
To open terminal: Applications->Accessories->Terminal
From the browser, to copy the path, press Ctrl-L. The graphical folder crumbline (can't find online definition for this word -- do you have one?) will turn into a simple text editor.
ipconfig/ifconfig
Linux equivalent of ipconfig: /sbin/ifconfig, or, if the path is set up right, ifconfig. (I hear that ifconfig, if it works, may not give as complete results as /sbin/ifconfig. I haven't confirmed this yet.)
On windows with cygwin, ipconfig | grep "IPv4" gives a summary of IP addresses.
On linux, use /sbin/ifconfig | grep 'inet addr' to get the same effect.
With a single cable, an alternative configuration (that doesn't require the "share connection" setting) is to manually set all your devices IP addresses. The bone's IP address can be configured using something like ifconfig eth0 192.168.1.100 netmask 255.255.255.0, and your computer's address using the Windows GUI (e.g. to 192.168.1.101). You will also need to set your virtual machine's IP address — this is possible to do with the GUI (e.g. to 192.168.1.102).
For a single cable, another alternative is to set up your wireless network to share with your wired network. Then Windows will act as a mini-DHCP server (or will pass through some information so that the Beaglebone can reach DHCP on the larger network). In the file /vim/etc/interfaces, uncomment the two lines auto eth0 and iface eth0 inet dhcp. Save the file, and run the commands ifdown eth0 and ifup eth0 until ifup succeeds in obtaining an IP address. (Sometimes the first attempt, sometimes much more than this.)
Prelab
There was no opportunity for prelabbing this week.
Introduction
Last week, we introduced sound to the system in the form of a talking clock. This week, we want to delve a bit closer to hearts of the problem, namely the raw movement of data to and from the soundcard. By the end of this lab, you will have a good understanding of the processor utilization from sound captures and playback from files.
Lab Objectives
Part 1: Getting started
Download and expand the alsa library headers and run the install script lab7setup.sh onto your Virtual Machine
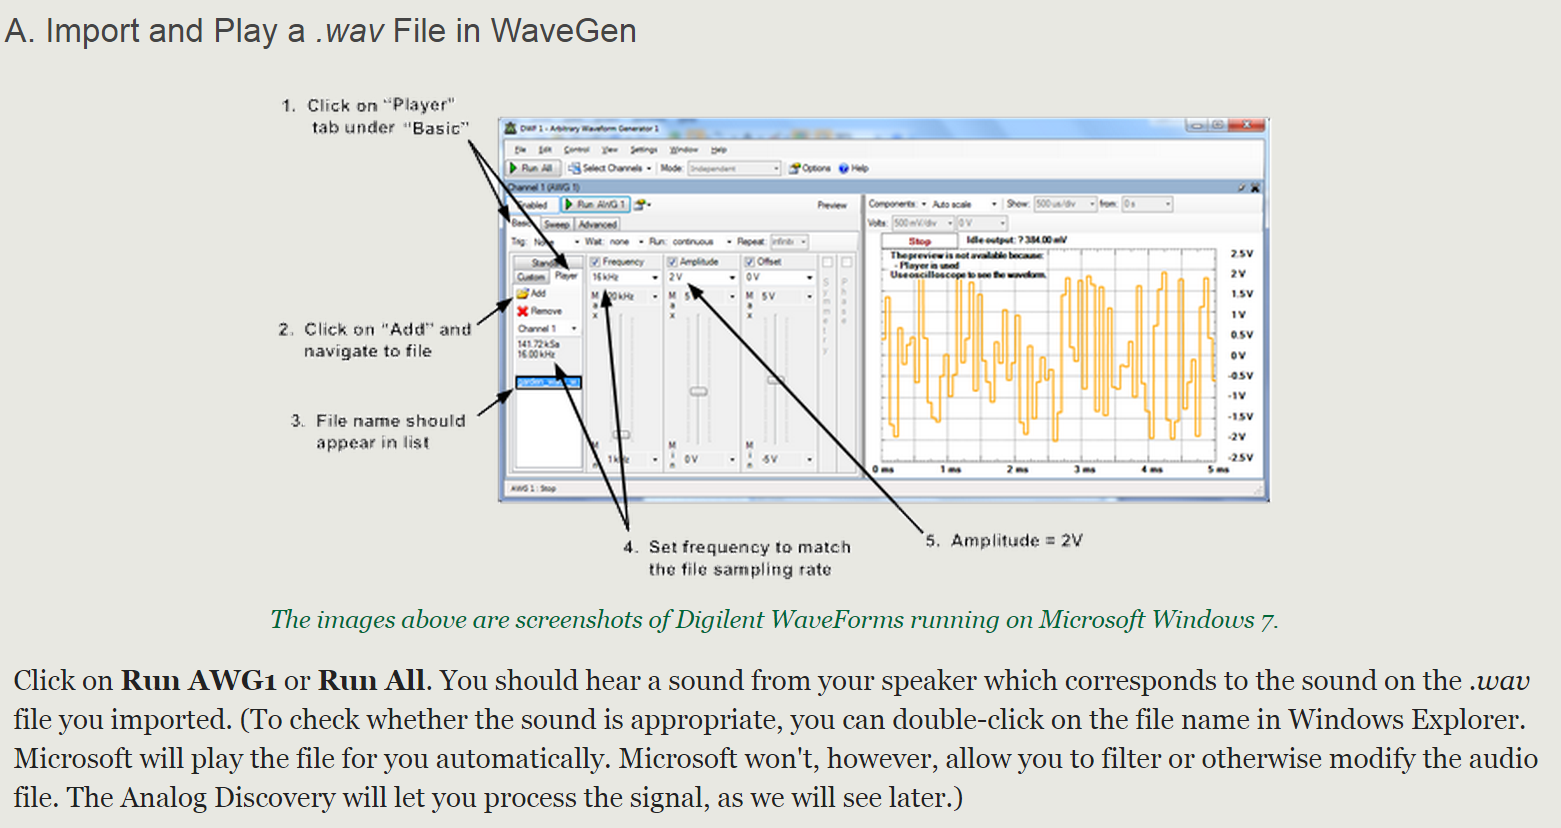
To start, you will need an audio source. If you a headset with a microphone, that will allow you to capture your voice. However, if you do not have a headset, you can use the analog discovery to playback audio wave files as inputs and listen to the output on headphones. If you would like to use a wave file, simply find a wave file and play it back using the instructions in Appendix A. (Note: You can also use clicks.wav if you like.)
For the initial tests, you can simply plug the audio output of the Analog Discovery straight into the audio input of the Beaglebone with the USB addendum. Be sure to plug in the USB audio addendum before booting the bone to ensure it is detected.
The USB audio jacks use the standard colors: pink - mic, lime (green) - speaker
Capture audio from the sound card and placing it in a file. To do this, download the second "provided" tar file to the BeagleBone. Change into the Lab7Provided folder and run the ./makeProducts.sh script. (Note: One of the three builds will fail, but the other two should work.) Once the builds are working, copy the executables onto the beaglebone. From the folder in the vm, I like to use a command like scp record root@192.168.7.2: (that final colon is important!)
To get this example to compile, you may need to install the library libasound2-dev with apt-get
Start with a frame size of 512 (the compiled-in default) and an audio capture rate of 22500 (22050 would also be fine, whatever the default is already compiled-in in the source). From the BeagleBone, capture 10 seconds of audio using the command
time sudo ./record plughw:1 audioCapture1.bin 10
(Recall that the command aplay -l (with a lower-case L) may help to find the right number, and that a reboot is often needed for the beaglebone to recognize inserted hardware -- it doesn't do plug-and-play.)
This command will capture 10 seconds of audio from the soundcard and store it in raw format in the file audioCapture1.bin. The output of this command will be details about the CPU usage for this program, as shown below.
real    0m10.261s
user    0m0.203s
sys     0m0.203s
Record this information and then playback the file using the command
time sudo ./playback plughw:1 audioCapture1.bin
Again, record the CPU utilization.
With this completed, modify the sampling rates to 8000, 11025, and 44100 and repeat the same things. (To find the source for the record and playback commands, you can peek into the .sh file you used to compile them.) What are the CPU utilizations? Once you complete this, also modify the Frame size to be 16, 32, 64, 128, 256, and the default 512. (This will require a little bit more sleuthing to find in the source.) Plot the results and explain what happens to CPU utilizations the configurations change. (Hint: You might find it easier to use nano and make these changes right on your beaglebone. It also would be wise to work with a partner and log the data into a spreadsheet right as you perform the tests.)
(Note: When performing these tests, I started with a frame size of 16 and a sampling rate of 44100. This gave me the error unable to set hw parameters: Input/output error. I had to restart the beaglebone to get the commands working again. Perhaps I was pushing the sound card too hard?)
Part 2: Creating a loopback system
One of the other things we can do is create a simple loopback application. In this system, your software will take the audio that present on the microphone input, capture it, and then immediately send it out to the headphone output. There will be some delay in this. Your task, given the code for the capture and playback using the class code, is to implement source code which will do this and then to measure the latency as the frame size is varied from 32 to 1024 occurs. The code is pretty straight forward. You will have two audio interfaces, one of which is a capture device and one of which is a playback device. Your main will read from the capture device and immediately write it into the playback device. Typically this would involve multiple threads. However, this program will just be single threaded. If you see the warning To measure the latency, you will need to connect up the Analog discovery and use the provided click track. This wave file is a digital metronome set to 120 beats per second with silence in-between. Start this playing in the analog discovery waveform generator and attach the headphone jack of the analog discovery device to the audio input of your capture card (pink).
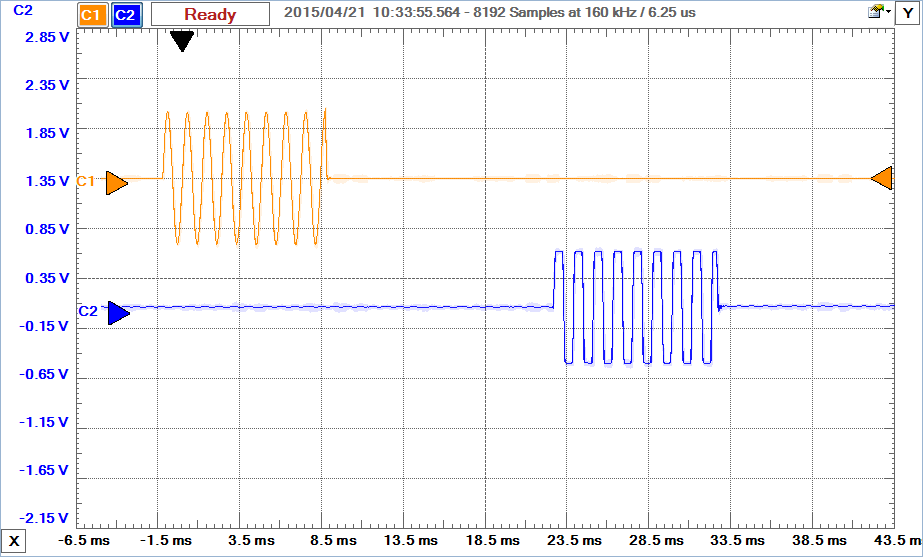
Connect the channel 1 wire of the oscilloscope to output W1 (or W2, whichever is playing back the waveform file). Plug your headphones into the green output and verify that the click track is playing. Then connect a cable from the headphone out jack of the sound card. Make a "poor-man's audio jack" from a couple of bent wires wrapped around the tip of end of the audio cable (see "Left" in the figure below), and connect this to scope channel 2. Adjust the scope until you can see the click track on the display and note the time difference. This is the latency. Be sure to zoom in a good distance so you can get a good reading, as shown below. With this technique perfected, vary the frame size to 32, 64, 128, 256, 512, and 1024, and in each case, measure the latency. How does it change with frame size? Staple the Lab 7 Checklist to the front of your submitted materials. Although you are not required to use the Report Template, you should include all the information required by the sample tables in the report, including the typical real recording time for your experiments. You can keep the default configurations. You do not need to change the frequency to match the sampling rate. In Waveforms (2015), it probably won't match. The most recent (2015) version of Waveforms does not load the .wav file correctly on Macs or Linux. Acknowledgement: This lab originally developed by Dr. Schilling.underrun occurred, this means that the program has missed a deadline for delivering audio samples to the speaker.Plug the signal into the breadboard from W1 and ground from the Analog Discovery. Then, make a "poor-man's audio jack" from a couple of bent wires wrapped around the tip of end of the audio cable (see "Left" in the figure below), with the other end plugged into the pink analog input.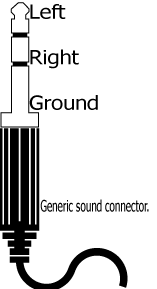
Deliverables / Submission
Appendix A: Playing a wave file in WaveGen