You will need headphones or speakers for this lab.
This assignment is a team assignment. Please work in teams of two unless approved by the instructor.
Introduction
In this lab, you will create a GUI using the Qt library and IDE. The application will be a talking clock with customizable photo display.
Prelab
Installing Qt Creator, etc. on VM (can be done with just VM on network)
This lab involves a few significant changes to your virtual machine environment. Ideally, you should do this on a wired connection, as there are significant downloads to be made. Be sure the "cable connected" box is checked under Network Settings (as usual). You should be able to ping Google before running these commands.
On your Virtual Machine, issue the following commands in order.
sudo apt-get update
sudo apt-get install qtcreator
sudo apt-get install xfce4 xfce4-goodies slim
sudo reboot
... install qtcreator will install the QT creator library on your machine. While this command is going on, you may need to hit q at one point as a page of textual information will be shown and hit N to not make changes form the default settings. The second install will update the GUI environment. You may need to select "slim" as the environment while going through this install. The third will shutdown your machine for a reboot. The first time you log into the new GUI, it will give you a choice. Choose "Use default config", NOT the "One empty panel".
After the reboot, you may discover you can no longer manually connect/disconnect the network within the VM. This is a known bug with some versions of Debian. The bug site lists a work-around (logging in as root) that has worked for the students who have tried it.
Once the machine is rebooted, issue the command
sudo apt-get install qt4-dev-tools
to install the qmake tools on your virtual machine.
Building your basic applications
In the slides, I might mention using .hpp instead of .h as an extension. Don't do this for the QT examples here. It might not work with the default configuration file provided. Just use the .h and .cpp extensions and filenames provided by the examples.
Once you have the QT Creator installed, you are to build your first application, a simple clock. Launch QT Creator through Applications Menu->Development->QT Creator. In your vm shared folder (e.g. /media/sf_vmshare/), create a qt folder, and within it a Lab6DigitalClock folder (e.g. /media/sf_vmshare/qt/Lab6DigitalClock). In the Lab6DigitalClock folder, create each example file from the Digital Clock Example and copy the contents from the webpage into the file. (You can do this from the Windows side through the shared folder. Be sure to give each file exactly the same name as in the example.) Launch QtCreator from Applications Menu -> Development -> Qt Creator. From QtCreator on the VM, open the .pro file with the File->Open File or Project menu/dialog. Accept the default import settings. I had to do this twice Spring 2016 to get it to work. If asked, click through to set up the Qt build environment. Run the project by clicking on the green arrows. You should see the clock running within your VM something like this:

To install the qt application on your beaglebone, copy the folder Lab6DigitalClock to the /home/debian/Desktop folder on the Beaglebone. On the Beaglebone, in the folder /home/debian/Desktop/Lab6DigitalClock, execute the commands qmake and make. Once the make completes, through the LCD, find the executable (digitalclock, shown as a blue diamond), and double-click it. You should see the clock run on the Beaglebone.
If you get a white screen, be sure to edit /boot/uEnv.txt as described in Lab5
If you want to recalibrate the screen move /etc/pointercal.xinput to /etc/pointercal.xinput.hidden (so the computer won't find it, but you can copy it back later if something goes wrong...) and reboot the BeagleBone.
Once you have completed this, compile and run the Simple Image Viewer example in the same way. This will walk you through constructing a simple QT image viewer. Again, verify that the code runs on your virtual box machine and then try running it on your Beaglebone.
Review the various source files you used to get the programs working, and the information on the pages they came from.
The Main event (Writing your source code)
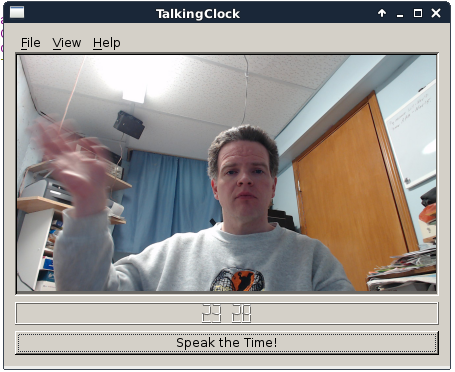
Once you have gone through these two tutorials, combine the widgets which are created in the first and second tutorials together with a pushbutton to create the application shown below. If the user clicks on the speak the time button, the application should make a system call to speak a message like "The current time is now 12:15:45." Make sure this program works on your Beaglebone.
While testing your prelab, simply print the message like "The current time is now 12:15:45" (with the current time) to the console rather than making a system call.
You do NOT need to capture images from the camera in this lab... maybe next week! But you DO need to show an image in your app.
Library Installation on your Beaglebone
You will need about 200MB of extra space on your Beaglebone to install the libraries needed for this lab. If your Beaglebone is Revision C, all is well. To check how much extra space is available on your beaglebone, use the df -h command.
If, as in the warning above, your df -h command does not show enough space on your BeagleBone's drive, follow these instructions to create enough space:
- Ensure the BeagleBone can connect to the internet (
ping google) - Run these commands to repartion the BeagleBone into all the available space.
- cd /opt/scripts/tools
- git pull
- ./grow_partition.sh
- sudo reboot
Install Libraries on BeagleBone
Find the USB audio jack and plug it into the BeagleBone. It is best to do this before booting up your BeagleBone.
When the BeagleBone is connected to the network, Issue the command
sudo apt-get update
sudo apt-get install qt4-dev-tools  # For Qt development
Getting the sound card and text-to-speach running from the command prompt.
Later on in lab, we are going to work with the soundcard. To install text-to-speach, run this command:
sudo apt-get install espeak # For text-to-speach
To install the soundcard, issue the following commands in order to install the sound libraries on your Beaglebone.
wget http://http.us.debian.org/debian/pool/non-free/s/svox/libttspico-data_1.0+git20130326-3_all.deb
wget http://ftp.us.debian.org/debian/pool/non-free/s/svox/libttspico0_1.0+git20130326-3_armhf.deb
wget http://ftp.us.debian.org/debian/pool/non-free/s/svox/libttspico-utils_1.0+git20130326-3_armhf.deb

sudo dpkg -i libttspico-data_1.0+git20130326-3_all.deb
sudo dpkg -i libttspico0_1.0+git20130326-3_armhf.deb
sudo dpkg -i libttspico-utils_1.0+git20130326-3_armhf.deb

sudo apt-get install mplayer
To test that the Beaglebone detects the USB device, run the command lsusb as root. You should see something like:
Bus 001 Device 002: ID 0d8c:000c C-Media Electronics, Inc. Audio Adapter
Bus 001 Device 001: ID 1d6b:0002 Linux Foundation 2.0 root hub
If the device is not recongnized, reboot the BB and try again.
To test that the sound card is working, run the command
speaker-test
You should hear white noise and see something like
With this completed, the following commands will generate a wave file with the textTesting 1 2 3 and will play it through the soundcard.
speaker-test 1.0.28

Playback device is default
Stream parameters are 48000Hz, S16_LE, 1 channels
Using 16 octaves of pink noise
Rate set to 48000Hz (requested 48000Hz)
Buffer size range from 2048 to 16384
Period size range from 1024 to 1024
Using max buffer size 16384
Periods = 4
was set period_size = 1024
was set buffer_size = 16384
 0 - Front Left
Time per period = 2.675086
 0 - Front Left
... and hear gentle white-noise through your speakers.
If you instead get an error like...
speaker-test 1.0.28

Playback device is default
Stream parameters are 48000Hz, S16_LE, 1 channels
Using 16 octaves of pink noise
ALSA lib confmisc.c:768:(parse_card) cannot find card '0'
ALSA lib conf.c:4259:(_snd_config_evaluate) function snd_func_card_driver returned error: No such file or directory
ALSA lib confmisc.c:392:(snd_func_concat) error evaluating strings
ALSA lib conf.c:4259:(_snd_config_evaluate) function snd_func_concat returned error: No such file or directory
ALSA lib confmisc.c:1251:(snd_func_refer) error evaluating name
ALSA lib conf.c:4259:(_snd_config_evaluate) function snd_func_refer returned error: No such file or directory
ALSA lib conf.c:4738:(snd_config_expand) Evaluate error: No such file or directory
ALSA lib pcm.c:2239:(snd_pcm_open_noupdate) Unknown PCM default
Playback open error: -2,No such file or directory
Then run the command aplay -L. This should show something like
null
    Discard all samples (playback) or generate zero samples (capture)
default:CARD=Set
    C-Media USB Headphone Set, USB Audio
    Default Audio Device
sysdefault:CARD=Set
    C-Media USB Headphone Set, USB Audio
    Default Audio Device
front:CARD=Set,DEV=0
    C-Media USB Headphone Set, USB Audio
    Front speakers
surround21:CARD=Set,DEV=0
    C-Media USB Headphone Set, USB Audio
    2.1 Surround output to Front and Subwoofer speakers
surround40:CARD=Set,DEV=0
    C-Media USB Headphone Set, USB Audio
    4.0 Surround output to Front and Rear speakers
surround41:CARD=Set,DEV=0
    C-Media USB Headphone Set, USB Audio
    4.1 Surround output to Front, Rear and Subwoofer speakers
surround50:CARD=Set,DEV=0
    C-Media USB Headphone Set, USB Audio
    5.0 Surround output to Front, Center and Rear speakers
surround51:CARD=Set,DEV=0
    C-Media USB Headphone Set, USB Audio
    5.1 Surround output to Front, Center, Rear and Subwoofer speakers
surround71:CARD=Set,DEV=0
    C-Media USB Headphone Set, USB Audio
    7.1 Surround output to Front, Center, Side, Rear and Woofer speakers
iec958:CARD=Set,DEV=0
    C-Media USB Headphone Set, USB Audio
    IEC958 (S/PDIF) Digital Audio Output
dmix:CARD=Set,DEV=0
    C-Media USB Headphone Set, USB Audio
    Direct sample mixing device
dsnoop:CARD=Set,DEV=0
    C-Media USB Headphone Set, USB Audio
    Direct sample snooping device
hw:CARD=Set,DEV=0
    C-Media USB Headphone Set, USB Audio
    Direct hardware device without any conversions
plughw:CARD=Set,DEV=0
    C-Media USB Headphone Set, USB Audio
    Hardware device with all software conversions
Look for the name like Set that is associated with your hardware (IEC958 (S/PDIF) Digital Audio Output in my case). Create a file /etc/asound.conf containing
pcm.!default sysdefault:Set
... where Set is replaced with the name of your audio device.
Run speaker-test again to ensure the sound card is working.
Once your speakers are working, run the command (installed with apt-get install espeak above)
espeak "Testing 1 2 3"
You should hear this through your speakers.
Now you can simply issue a system command from your BeagleBone with the same command, but replacing "Testing 1 2 3" with the current time message.
Appendix: A variation on getting the sound to work
The final command may need to be changes based on how your soundcard ends up being setup. Dr. Schilling used mplayer -ao alsa:device=hw=5 test.wav. The command aplay -l (with a lower-case L) may help to find the right hardware number. (More details on superuser) For example, when I ran it it produced something like ...
**** List of PLAYBACK Hardware Devices ****
card 1:
I believe the card number corresponds to the nuber you put after hw= in the mplayer command. This stack overflow question may have more info.
Deliverables / Submission
If you have any questions, consult your instructor.
Hints
Here are a few websites you might want to look at if you are stuck:
- http://ldc.usb.ve/docs/qt/tutorial-t5.html
- https://wiki.qt.io/How_to_Use_QPushButton
- http://exploringbeaglebone.com/chapter12/
- https://www.youtube.com/watch?v=PQEBoftbtVQ
Acknowledgement: This lab originally developed by Dr. Schilling.
Due: Week 7, Monday, 11pm. As discussed in class, due Week 6, Friday, in class.