This is an old version of this course, from Spring 2015. A newer version is available here.
This assignment is a team assignment. Please work in teams of two unless approved by the instructor.
Equipment Needed
New section, up Monday
- Your beaglebone black
- 5 V power supply (probably good to get in the habit of using this)
- SE3910 Kit (Checkout from Tech Support)
- USB Oscilloscope (Digilent Analog Discovery)
- Beaglebone Breadboard Cape
- (optional) Beaglebone Breakout Board
- A few 2 or 2.2 KΩ resistors (Checkout from me if not in kit)
- (optional) NMap especially zenmap
- Two network cables, or more if you want to share
Prelab
Read through the Lab Procedure. Do what you can without the check-out hardware. This includes writing a network communication program in C and compiling it in your virtual machine (both regular and cross-compiled).
Please demonstrate all your pre-lab accomplishments at the beginning of lab, and let me know any challenges you overcame in the process.
Some VM and Linux Tips
VM
Use right-control to excape from the virtual machine.
To open terminal: Applications->Accessories->Terminal
From the browser, to copy the path, press Ctrl-L. The graphical folder crumbline (can't find online definition for this word -- do you have one?) will turn into a simple text editor.
ipconfig/ifconfig
Linux equivalent of ipconfig: /sbin/ifconfig, or, if the path is set up right, ifconfig. (I hear that ifconfig, if it works, may not give as complete results as /sbin/ifconfig. I haven't confirmed this yet.)
On windows with cygwin, ipconfig | grep "IPv4" gives a summary of IP addresses.
On linux, use /sbin/ifconfig | grep 'inet addr' to get the same effect.
With a single cable, an alternative configuration (that doesn't require the "share connection" setting) is to manually set all your devices IP addresses. The bone's IP address can be configured using something like ifconfig eth0 192.168.1.100 netmask 255.255.255.0, and your computer's address using the Windows GUI (e.g. to 192.168.1.101). You will also need to set your virtual machine's IP address — this is possible to do with the GUI (e.g. to 192.168.1.102).
Cross Compiling with Eclipse
Some hopefully obvious button clicks are not mentioned in these instructions.
In the virtual machine, start eclipse under Linux using the command eclipse & from the console, or Programming->Eclipse from the Applications menu. Select a workspace that you would like to use (ideally in the shared library segment that you can access from both Windows and Linux — recall these appear on the VM in the /media folder. I use /media/sf_vmshare/workspace). In Eclipse, select "File->New->Project" and "New C Project". Enter a project name of "Lab4Test". Click on next until you get to the Cross GCC Command screen. Enter the compiler prefix arm-linux-gnueabihf- and the path /usr/bin, then click "Finish".
Add a new C file to the project (File->New->Source File), named test.c, and enter this code:
#include <stdio.h>
#include <stdlib.h>
#include <unistd.h>

int bss_var; 		/* This is an uninitialized global variable. */
int data_var = 1;	/* This is an initialized global variable. */
static int  lv;
static int lv2 = 1;

int main(int argc, char* argv[])
{
  void *stack_var; /* This is a local variable declared on the stack.*/

  char hostname[1024];  // This is an array declared Pon the stack which will hold the hostname.

  stack_var = (void*) main;

  printf("Hello WOrld!  Main is executing at address %p\n", stack_var);
  printf("This address (%p) is in our stack frame\n", &stack_var);

  printf("The printf function is located at location %p.\n", printf);

  /* The bss section contains uninitialzed data. */
  printf("This address (%p) is our bss section\n", &bss_var);

  /* Data section contains initialized data */
  printf("This address (%p) is in our data section\n", &data_var);

  /* This is a static variable which is uninitialized. */
  printf("The address of the static variable which is uninitialized is %p.\n",  &lv);

  /* This is a static variable which is initialized. */
  printf("The address of an initialized lv variable is %p\n", &lv2);

  /* read the hostname. */
  gethostname(hostname, 1024);

  /* Print out the hostname to the console.*/
  printf("Hostname: %s\n", hostname);
  return 0;
}
Save and build the code (Project->Build All). It should build cleanly. Goto the Window -> Show View -> Other -> Remote Systems -> Remote Systems tool. This will open up the Remote Systems tab. Right click on "Local" and select "New -> Connection". Select "Linux" and configure the connection with the IP address or domain name of your beaglebone (e.g. 192.168.1.100) for the "Host name," an Beaglebone Machine for the "Description." Click Finish.
As you go through the setup screens, set them up to match the images below:
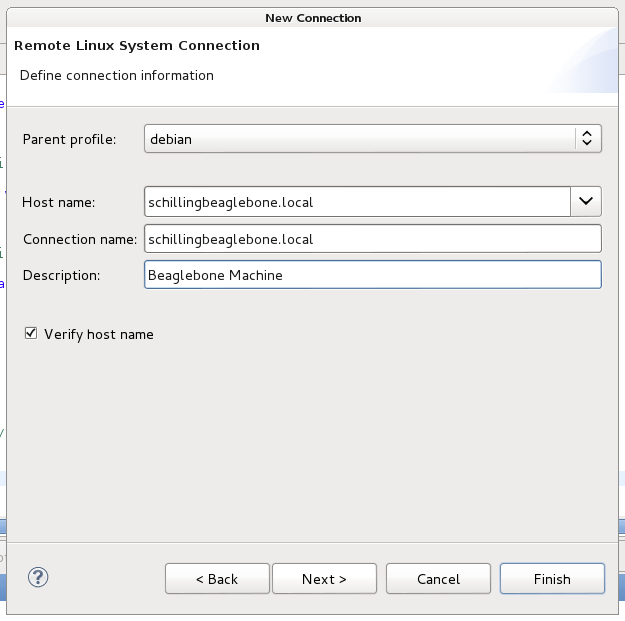
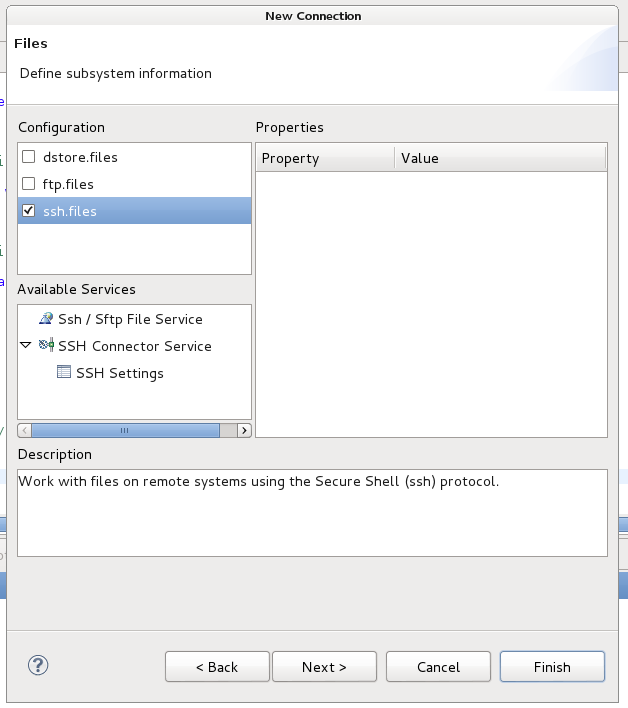
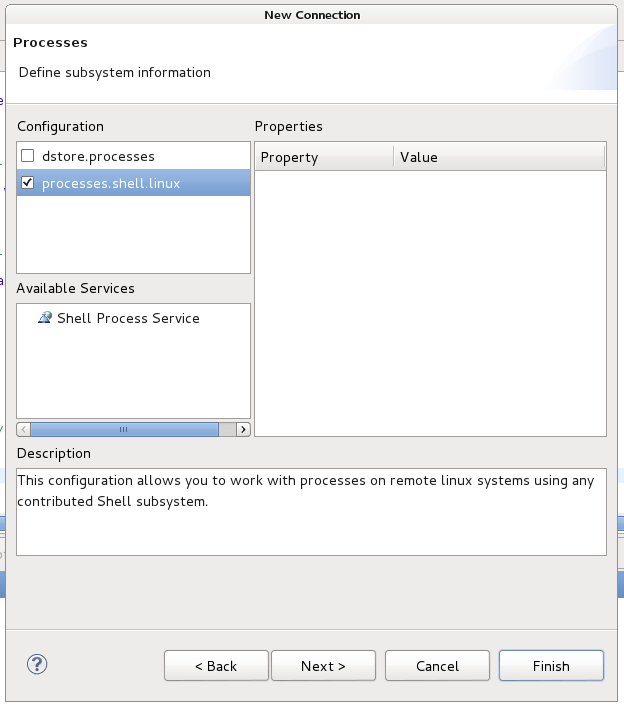
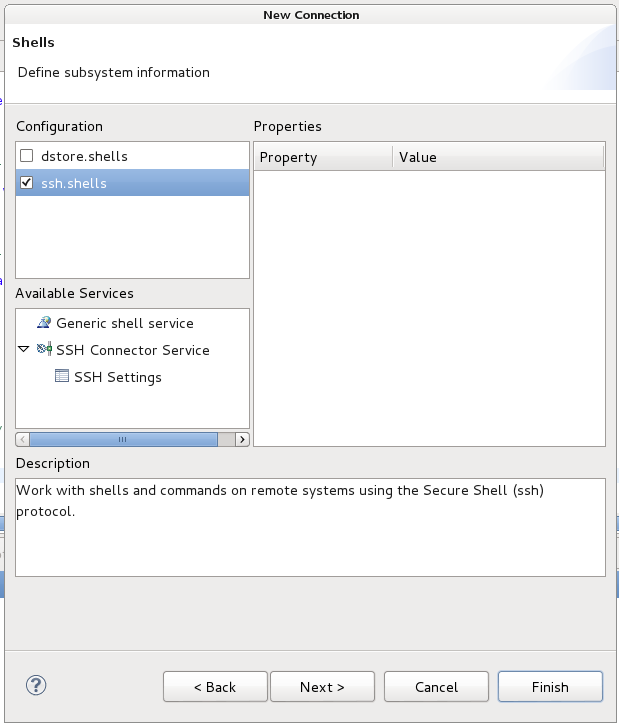
Right click on your Beaglebone and click connect. Enter debian as the user id and temppwd as the password.
With the connection made, select the built binary (Lab4Test->Binaries->Lab4Test, also available through Debug folder), right click, and select copy. Copy the binary to the remote machine (Under the remote machine, open Sftp Files, the My Home.) On the remote system, right click on ssh terminals on the beaglebone machine and "launch terminal". You should now be able to run the program on the remote machine. (Note: You may have to change permissions to allow you to execute the program. These were the permission commands talked about in operating systems. As a refresher, chmod u+x Lab4Test is probably what you need.)
When the program runs, take note of record the various addresses for main, the stack, the bss section, and the data section.
Compiling for the VM
New subsection, added MondayNow in Eclipse right click on the project (Lab4Test under Project) and select properties. Select the Tool chain editor (You can find by typing "tool chain" in the the search box), and change the current toolchain to LinuxGCC. This will cause Eclipse to build for your Linux virtual machine instead of the Beaglebone target. Go to Project -> Build all to build your source code. Then go to run -> run as -> Local C/C++ Application and execute the program. Record the addresses for main, the stack, the bss section, and the data section. Write how they are different from what you recorded for the Beaglebone Black.
Once you are done with this, set your environment back to the default settings. You can do this by going to the Properties page for the project and selecting the C/C++ Build entry and Settings.
Compiling a larger project
New subsection, added MondayNow that we have gotten this far, we are going to build a more substantial program which serves as a calculator. Create a new cross compiled C project called "Lab4Calculator" in Eclipse and download the tar file from the course website. Extract the source file calculator.c into the directory, and the source code should be included into your project (If it is not, manually create a new C file with any other name, and copy-paste the code from the calculator.c into this file. Delete any files that you don't want to later appear from your project folder.). Click on build and you should see the error messages shown in Figure 15. What kind of error is this message indicating?
To see the compile-time console output for a specific project, click on that project in the tab on the left.

Right click on the project and select Properties. Under C/C++ Build, select Settings. In the main window, under "Cross GCC Linker", select "Libraries. Add the "m" library. (As discussed in class, this will link against the pre-compiled library libm.m, but you only need to put "m" for the library name.) Rebuild the code and you should have a working calculator. Test the program on the beaglebone using the techniques shown previously. Take a screen capture of your remote terminal session to the Beaglebone. (It's a litle flakey. You don't need to fix it.)
Now that you have the program working on the Beaglebone, switch back to the command console and connect to the Beaglebone using the ssh command. (When not using putty, you should specify the username with @. For example: ssh root@192.168.1.100). Verify that you can start the program from a plain console independent of Eclipse.
Measuring latency
Interrupt-driven
For the interrupt-driven circuit, you may use the code from Lab 3. However, you may find it convenient to use the code provided by Derek Malloy (below), and this simple example demonstrating how to use it: respond.cpp. (You can create a new project for this.)
Derek Malloy's GPIO.h and GPIO.cpp provide a simple C interface to GPIO pins. Derek Malloy's GPIO needs to be linked against the pthread library (in the same way you linked against the m library above.)
When selecting GPIO ports, choose those in the range highlighted in the figure below. (Image compiled from images on ti.com and elinux.org)
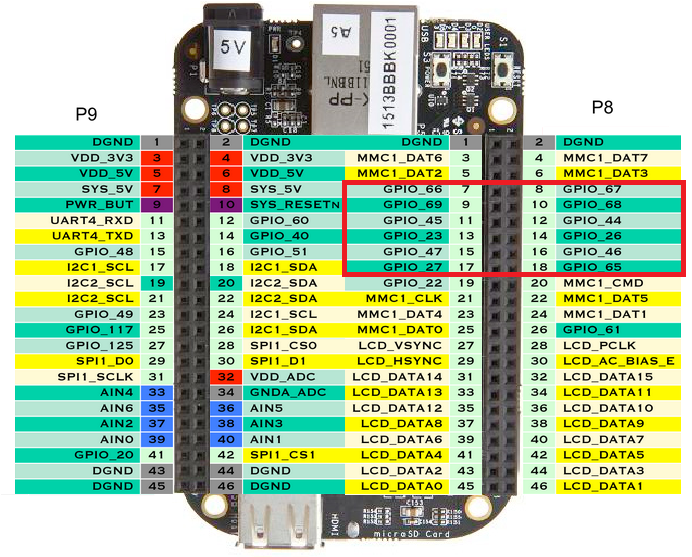
Connect an input switch to a GPIO port as illustrated in the schematic below:

Connect an output switch to a GPIO port as illustrated in the schematic below:

Interrupt-driven over internet
As a team, split the two programs to be written between the two members of your team:
- Client. This program should create a TCP connection to the server. When a button is pressed, it should send a message to the server.
- Server. This program should accept a TCP connection from the client. When a message is received, based on the message received, it should turn an LED on or off.
Both programs need to be written in C/C++ using the low-level Linux/C socket libraries.
Before you begin writing your programs, agree on a simple protocol that the two programs will use to indicate if the LED should be turned on or off on the server.
In writing the code for the client and server, these simple client.c and server.c files could be useful. (These are the complete versions of what we looked at in class.)
For each input our output circuit, use the appropriate schematic from the previous section.
Measure these signals:
- The button press
- A local GPIO port written right after the button press
- A remote GPIO port written right after the receive on the remote client
You will only be able to measure two signals at any given time. To measure both the button press and the remote GPIO port, you can wire up the system something like the figure below:

Determine the delay due to the interrupt response, and the delay due to sending a message over the network
Deliverables
For your report, use the template SE3910Lab4Report.docx. Follow the instructions in the report. To complete the report, you will need:
- Screenshot (or text) of the Lab4Test program running on the beaglebone with addresses, etc.
- Screenshot (or text) of the Lab4Test program running on the VM with addresses, etc.
- Screenshot of calculator program running on the Beaglebone.
- Screenshot of oscilloscope capture used to measure interrupt latency
- Screenshot of oscilloscope capture used to measure network latency
- Textual narrative describing these (See report template for details.)
In addition to the report, upload your source files. When dropped into the appropriate Eclipse projects, these should compile and run. To aid in testing, for any extra files, please clearly state at the top whether they are required for the server, the client, or both. You do not need to upload GPIO.h or GPIO.cpp unless you edited these files.
Excellent Credit Ideas
If you complete the lab this week, that is excellent enough.
If you have any questions, consult your instructor.
Submission Instructions for Dr. Yoder
Submission due 11pm, Monday of Week 5
Please upload a screenshot containing two traces — one for the button input and one for the LED output from the beaglebone, showing the latency between when the button is pressed and the LED changes its state.
Also include a text file including the latency as you read it from the screenshot. Put your name and the date at the top of this text file.