**We provide a virtual machine image that is already configured for you**: You can download the file itself, or a zipped version to save bandwidth:
* [VM Baseline Image](http://www.walterschilling.org/msoe/fall20182019cs3841/SE3910CS3841Fall2018BaselineVM.ova)
* [VM Baseline Image (zipped)](http://www.walterschilling.org/msoe/fall20182019cs3841/SE3910CS3841Fall2018BaselineVM.zip)
# Installing the virtual machine
## Confirm virtualization is enabled in the BIOS
If virtualization is not enabled in your BIOS, you will need IT to enable it for you. Since the BIOS is locked, you cannot check it there. Instead, look in the task manager.
<a name="bios"></a>
### Confirm that virtualization is enabled in Task Manager's Performance tab
* Press control-alt-delete and select the Task Manager
* If you don't see any tabs at the top of the window, click on "more details" in the bottom left corner.
* Go to the Performance tab.
* In the bottom right corner, it should say, "Virtualization: Enabled"
<!--  -->
<img src="vmsetup_res/virtualization.png" alt="Image: Task Manager's Performance tab should show 'Virtualization: Enabled'" width="700"/>
### Enabling Virtualization @ IT
* If virtualization is not enabled, you will need to go to the IT Helpdesk and have them enable it for you. Please do this before coming to the first day of class if possible.
## Install VirtualBox
* Download and install the latest version of VirtualBox
## Install the virtual machine
**We provide a virtual machine image that is already configured for you**: You can download the file itself, or a zipped version to save bandwidth:
* [VM Baseline Image](http://www.walterschilling.org/msoe/fall20182019cs3841/SE3910CS3841Fall2018BaselineVM.ova)
* [VM Baseline Image (zipped)](http://www.walterschilling.org/msoe/fall20182019cs3841/SE3910CS3841Fall2018BaselineVM.zip)
Once the image is downloaded, all you need to do to install it is to double-click on it.
<br>
**If you are feeling very adventerous**, you can choose to create your own VM image. This will take significantly longer than using the provided image, and you may find that you have to fix things on your own that the instructors have already set up on the default iamge. But you will also have the satisfaction of setting up your own Debian machine for software development. Here are my notes on how I created my own virtual machine to complete Lab 1:
* Download debian-9.5.0-i386-netinst.iso (or a similar)
* https://www.debian.org/CD/netinst/
* The network install can reduce your total download size by only downloading the packages you need
* In virtualbox, create a new Linux virtual machine
* Select the .iso image as the optical drive / cd drive contents
* Start the virtual machine.
* Go through the default install procedure.
* This takes some time and requires babysitting!
* Name your machine cs3841-foggp, replacing foggp with your own username.
* Choose a reasonably secure password
* If you don't choose a specific desktop environment, it will choose one for you.
* Use your MSOE username for your username
* I used ```cs3841``` as the username and ```student``` as the password.
* Enable guest additions within your guest OS. This enables useful things like copy-paste between the VM and the OS and mouse integration.
* Short route: (Haven't tested this recently)
* In the virtual machine window, click on Install Guest Additions... from the Devices menu, then run ```sudo mount /media/cdrom.```
* ```cd /meda/cdrom; sudo runasroot.sh```
* Long route: (Following: https://virtualboxes.org/doc/installing-guest-additions-on-debian/)
* Run ```sudo apt-get update``` to update the database
* Run ```sudo apt-get upgrade``` to get latest version of the packages on your system
* Run ```sudo apt-get install build-essential module-assistant``` to download the packages needed by the script
* Run ```sudo m-a prepare``` to enable kernel modification
* In the virtual machine window, click on Install Guest Additions... from the Devices menu, then run ```sudo mount /media/cdrom.```
* Run ```sudo sh /media/cdrom/VBoxLinuxAdditions.run```
* Set up the shared folder
* Set the shared folder to point to ```C:\lwshare```
* Add the user cs3841 to the vboxsf group:
```sudo usermod -a -G vboxsf cs3841```
* Reboot the virtual machine
## Setting up your development environment
### Eclipse and Git
**We provide a virtual machine image that is already configured with Eclipse and Git for you**. However, you may still want to set up ssh keys, as in the next section
* Install Eclipse
* Run ```sudo apt-get install eclipse``` to install the Eclipse IDE.
* Run ```sudo apt-get install eclipse-cdt``` to install the C/C++ development environment within Eclipse
* <mark>If you install Eclipse a different way, be sure to also install the packages ```gcc-c++``` and ```gdb``` with ```apt-get```.</mark>
* Install Git
* Run ```sudo apt-get install git``` to install this version control system
* Run ```sudo apt-get install git-gui``` to install the graphical version of git.
<a name="ssh"></a>
### Git SSH Keys for Automatic Login
Follow these instructions if you do not want to type your username and password every time you push to git.
* Make a public/private key pair (following https://confluence.atlassian.com/bitbucket/set-up-an-ssh-key-728138079.html)
* Create the key by running the command ```ssh-keygen```
* Accept the default location by pressing enter.
* Specify no password by pressing enter again twice.
* Copy the key.
* Print it to the command prompt with ```cat ~/.ssh/id_rsa.pub```
* Then copy it by selecting it, right-clicking, and selecting copy (Control-C means something different in a command prompt -- it means "kill the current program")
* Go to your user account settings at github.com, go to the section "SSH and GPG keys," create a new key, and paste the public key into it. Give it a name like "CS3841 VM"
* Now, github will automatically offer you the ssh-based git pull command.
* If you have not cloned the project yet, go to the project page, select "Clone" and "Use SSH" if it is not already showing the SSH URL:<br>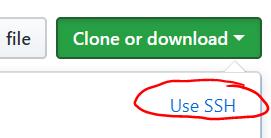<br>Copy the SSH URL:<br>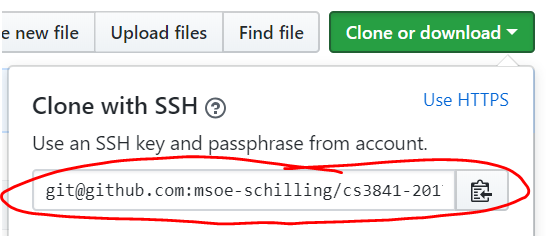
* If you already pulled it with https, get the new url and reset the url with a command something like ```git remote set-url origin git@github.com:username/repositoryname.git```
* (Following
https://confluence.atlassian.com/bitbucket/change-the-remote-url-to-your-repository-794212774.html)