This is an individual lab.
Power up and connect to the Bone Web-server
Follow the instructions to get started at beagleboard.org. Do all three steps:
- Plug in your Beaglebone via USB
- Install drivers
- Browse to webserver on the Bone (usually 192.168.7.2 through USB, so the web server is at http://192.168.7.2)
- You do not need to continue through the Troubleshooting or Update board with latest software Sections or beyond.
(If you want your Beaglebone to be able to access the internet through your computer through the USB, these instructions have worked for a student in the past.)
When your bone is turned off, you can see the pages served by its server at Learn->Introduction on the beagleboard.org webpage.
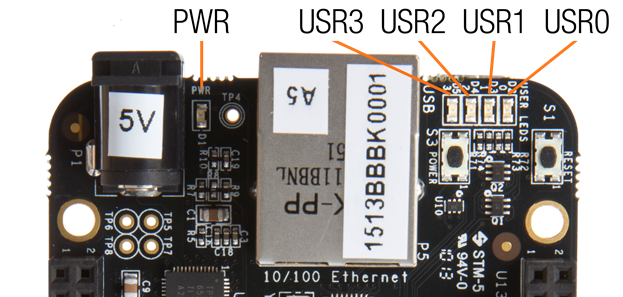
Please press and hold the power button (right by the ethernet port and the blue LEDS) and let the bone turn off by itself whenver possible to reduce wear on the hardeware. Press and hold until all the lights go out. Then you can release.
Try some of the examples running on your Bone
Once you connect to the bone, you should be able to run example code through the web server at http://192.168.7.2. Try and note what each of these do:
- getPlatform (you may want to save the results of this script to a file on your computer for future reference.)
- digitalWrite
- Demo: Blink on-board LED USR0.
- Restore LEDs to default state (This is the third script example here)
SSH into your bone
I advise not to store files long-term on the bone. They won't be erased if it powers off, but if it becomes corrupt, it sure is nice to have a back-up!
- Download PuTTY (putty.exe) or use the ssh client of your choice.
- Double-click on the downloaded putty.exe to run it.
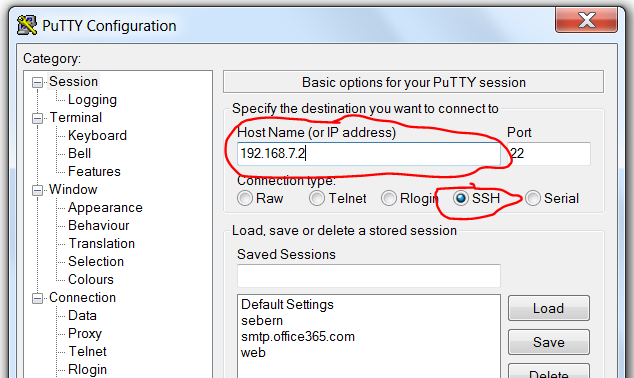
- In Putty, enter the IP address of your beaglebone (probably 192.168.7.2),
and make sure that SSH is selected. Click "Open" to open the connection.
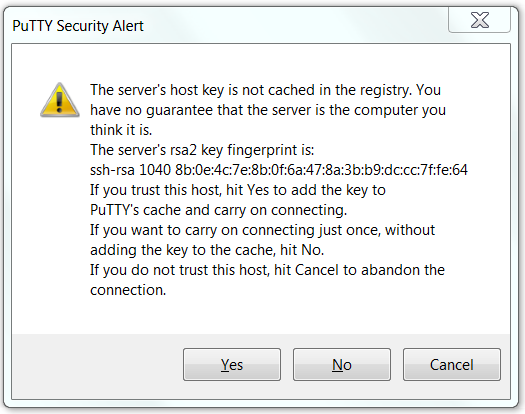
- If you get an alert, select "no". (This will make it easier to connect to multiple bones, or to a re-imaged bone.)
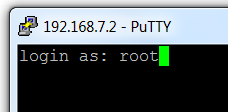
- At the login prompt, login as "root". Don't enter anything for the password; just press ENTER.
- Now you should be logged in. If you type
ls, you should see something like: (ls lists the files in the current directory. Newer versions do not have a Desktop, so nothing is printed at all.)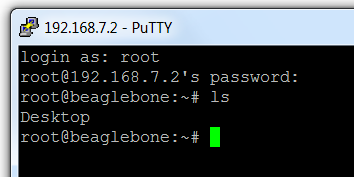
- Now run the command
pwd(print working directory). You should get a result like/home/rootor/root.
In the Spring 2017 offering, the following commands are optional.
- Now run the command
cat > tmp.jsThis will redirect what you type ito the file tmp.js. Copy and paste the blinking LEDs demo from the website into this file. You can right-click in PuTTY to paste the current contents in the buffer. To end entering the file, use Ctrl-D on an empty line. (that is, press ENTER and then press the control button at the same time as the D button) - To run your javascript program with Node.JS, type
node tmp.js. You should see the LED blinking just as if you had run the example through the web server.
When using ssh from a command-line like cygwin's bash or the BeagleBone's bash, use ssh username@host to specify which user you want to log in as.
(Optional alternative to PuTTY) Installing Cygwin
My default install of cygwin includes cygwin's own defaults, plus rsync and ssh (openssh). You can find these by typing them in the search box, and then installing the package with the name you searched for that is under the "Net" category (use openssh to get ssh -- this includes both the server, and the client).
My default cygwin install takes 115 MB on the C drive
If you are considering this route, please let me know.
Useful commands for bash shell
Some useful commands for the BASH shell (that is, what you reach on the bone through SSH)
- ls
- List contents of current directory
- pwd
- Print working directory
- cd other
- Change to directory other
- cd ..
- Change to parent directory
- rm file
- Delete the file file
- cat > file
- Start typing the contents of the file
- Ctrl-D
- End typing the file
- Ctrl-C
- Cancel the currently-running command
- echo some
- Write some to the console
- exit
- logout
Do something fun!
In the Spring 2016 offering of this course, there is no need to go any further. However, you may want to explore what the BeagleBone offers.
You may want to check out a sensor from TechSupport and interface it to the bone. Does the sensor behave the way you expect? You may want to write a Javascript program for the bone using Node.js. Note that javascript is a non-blocking language. The best programs will be written in the non-blocking style and do clever things with the inputs and outputs the bone provides.
More ideas
- Make a variable-brightness LED by sending it a pulse-width modulated signal.
- Control a servo with a pulse-width modulated signal
- Do something fun with an external LED
- Potentiometer with analog inputs
- node.js serves a web-page of your own that interfaces to the switches and LEDs
- A cool sequence with the built-in LEDs and event-driven node.js
Please turn off the bone (using the power button) before connecting any capes.
Submission Instructions for Dr. Yoder
This week's lab is really just part of the prelab for the Week 2 lab. Please send Dr. Yoder an email when you complete this lab with the output of the pwd command run on the BeagleBone