Introduction
In this lab, we are going to build a simple camera which will take pictures when commanded via a pushbutton. The pictures can then be viewed on the LCD display of the Beaglebone.
Prelab
Before coming to lab, complete these steps:
- Required
- Set up the chroot (change root) as described in the textbook
- Compile boneCV.cpp on the Beaglebone
- Recommended (can also do during lab)
- Develop your code for the lab on the Virtual Machine
- Install required packages on the Beaglebone
- the gpicview image viewer program
- the OpenCV development libraries
- Optional (In addition to changeroot)
- Install the header files on the VM outside the changeroot to use Eclipse for most of development
If you get stuck trying to get the changeroot to work, move forward and write and compile your camera-LED program for the VM instead of for the Beaglebone. Or install libopencv-dev on the Beaglebone (This requires your Beaglebone to be able to ping Google.)
Installing a chroot on the VM
On this lab, we are going to use a technique called a change root (chroot) on the virtual machine (VM) to allow us to change the operating system that we are running from within a different operating system. This is detailed in the class textbook. Do everything in the section "Installing a Change Root" including subsections "Installling an armhf Change Root" and "Emulating the armhf Architecture" (pp. 257-260). However, wherever the instructions say wheezy, substitute the text jessie, as Jessie is the distribution we are using in class whereas Wheezy was the previous version that the textbook was based off of. You do not need to continue into the the next section, "Cross-Compiling Using Eclipse". In Malloy's book, BBB is an abberviation for BeagleBone Black, and EBB is an abbreviation for Exploring BeagleBone (the title of the book).
Once you have the chroot setup, switch into the chroot and issue the command
apt-get install pkg-config
This will install the linux package configuration manager in the chroot, allowing us to compile code for the Beaglebone on the host using the packages from the linux distribution on the Beaglebone. When this is finished, issue the command
apt-get install apt-file
This will install the apt-file search tool that will allow us to find dependencies based on file names. When apt-file installation is finished, issue the command
apt-file update
to get the latest files from the repository servers. Lastly, install the opencv development libraries with the command
apt-get install libopencv-dev
Compile boneCV.cpp in the ChangeRoot
Download the file boneCV.cpp. This program will use openCV to capture an image from the camera and to filter it into greyscale and using an edge detection algorithm, and write each image to a file. Ultimately, we will only be using the image capture and file writing portions of this in our final project, but this shows how simple it is to add computer vision features to your program if you desire to.
Transfer this cpp file to /BBBchroot within your VM.
With the change-root enabled, run the command:
g++ -O2 `pkg-config --cflags --libs opencv` boneCV.cpp -o boneCVIf you type this command, be sure to type a letter O instead of a digit 0 for -O2. Also, use the accute accent quotes `...` instead of single quotes '...'
This will compile the program within the VM. After compilation is completed, execute the program. Assuming no camera is attached to your changeroot within the VM, you should see the message
Started Processing - Capturing Image
Failed to connect to the camera.
Failed to capture an image
Writing and Compiling your code
This assignment is a team assignment. Please work in teams of two unless approved by the instructor. (Once you both have the chroot installed.)
Once the libraries are installed, you will be developing a camera application. This application will use openCV to capture images and store them to files. You will be able to vary the size of the image captured. For this exercise, you will be capturing png files, though other files can be captured as well.
The program has these basic requirements
- Requirement R1: When the user presses a pushbutton, the camera shall take a picture and store it into a jpg file. The user can repeat this as long as desired.
- Requirement R3: The program shall turn on an LED while the camera is taking the picture.
- Requirement R4: The program shall turn on a second LED while the actual file write of the image occurs.
- Requirement R5: The input and output GPIO port numbers (one input switch and the two outputs for R3 and R4 above), and the height and width of images captures shall be accepted as command line arguments
- Requirement R6: The program shall automatically increment the number of the image file saved as each picture is taken.
- Requriement R7: When run without parameters, the program shall print out the arguments in the order it expects them.
Your program may take an arbitrarily large number of pictures. It is OK if the user needs to use Ctrl-C to exit.
Create a new project for your program. Make sure to check that you use the workspace located on the shared folder of your VM.
Compile your program on the VM outside the changeroot, then, once it is bug-free, copy the code into the changeroot and compile it there.
You will need GPIO.h and GPIO.cpp from Lab 3 or Malloy.
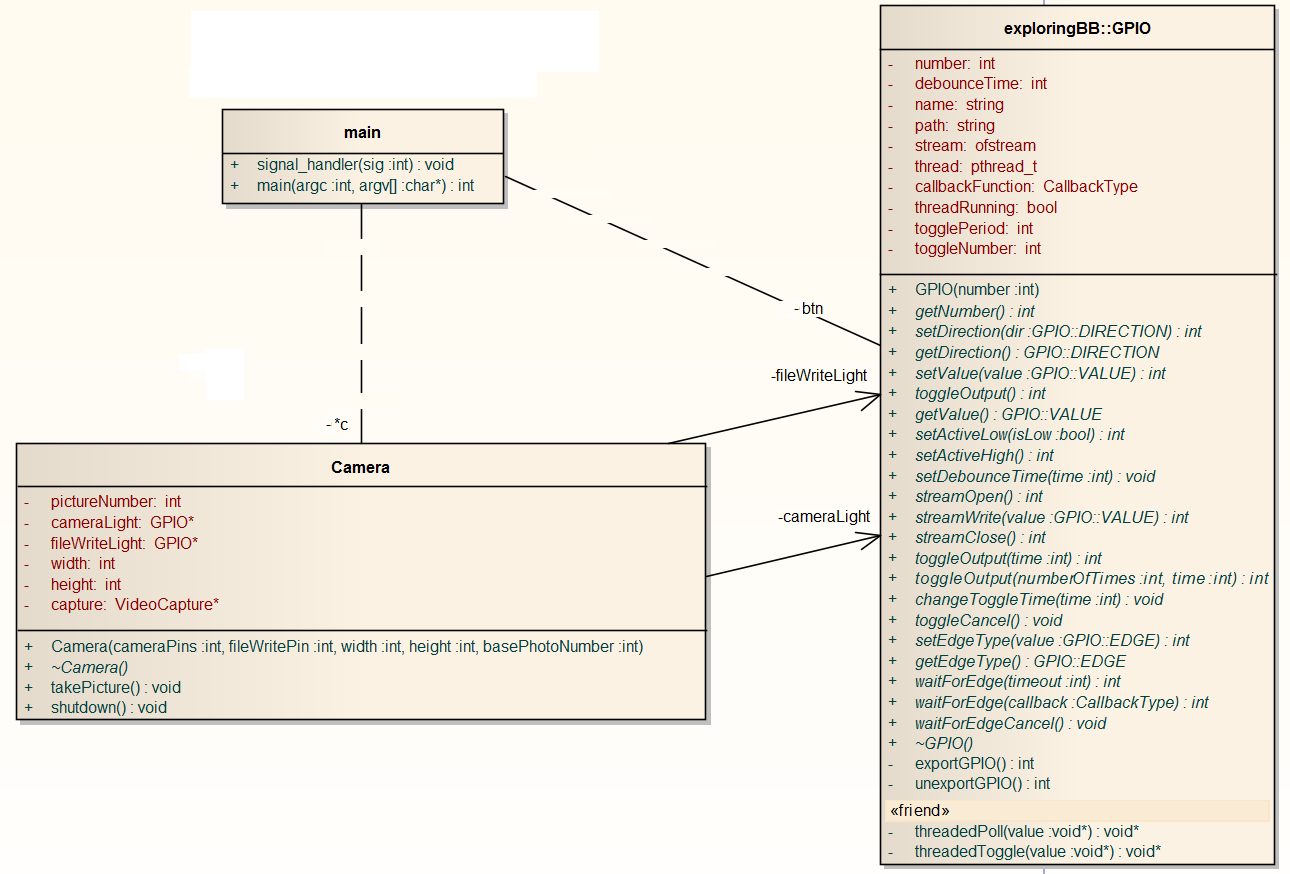
Below is a template UML diagram. Your code does not need to match this exactly, but this is a good starting point for your system design. You will want to perform your setup for the camera once in the constructor, and then simply capture frames and write them out in the takePicture function. Note that the box "main" is not a class. It is a file holding the main method.
Install required packages on the Beaglebone
Log into your Beaglebone as root and connect it to the internet (e.g. ping google.com should work). Issue the following commands in sequence to install appropriate libraries (Use sudo for each command if you didn't log in as root):
apt-get update
apt-get install gpicview
apt-get install libopencv-dev
If the BeagleBone is not connected to the internet, these commands will say that the package is not found. Make sure you can ping google if these commands are not working.
The update command will update the package listing on your Beaglebone to reflect the most current packages which are available. The install commands will install the gpicview image viewer program and the OpenCV development libraries, which are necessary to access the camera.
Running the program
Once you have a program compiling in the changeroot, and once you have installed the OpenCV library on the BeagleBone, you should be able to simply copy the program to the BeagleBone and run it.
Run the boneCV program that you compiled in the prelab.
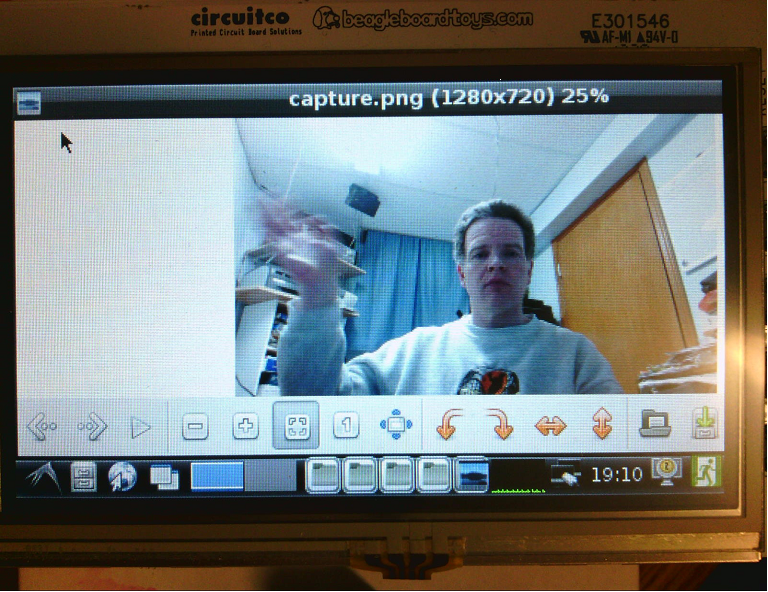
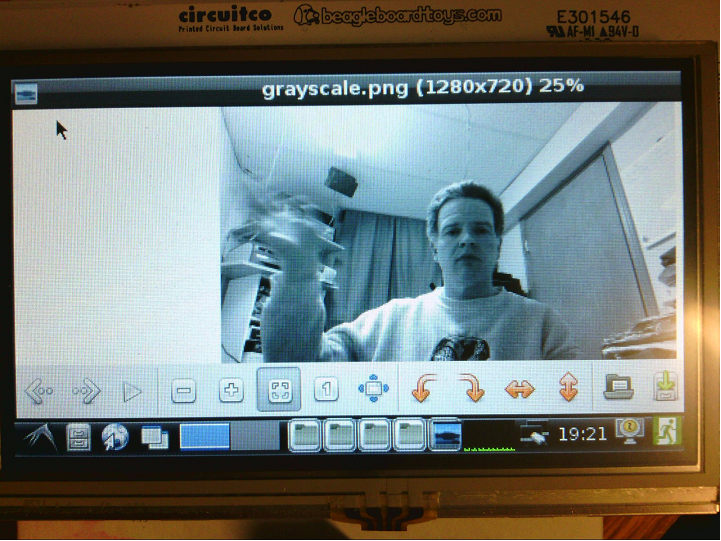
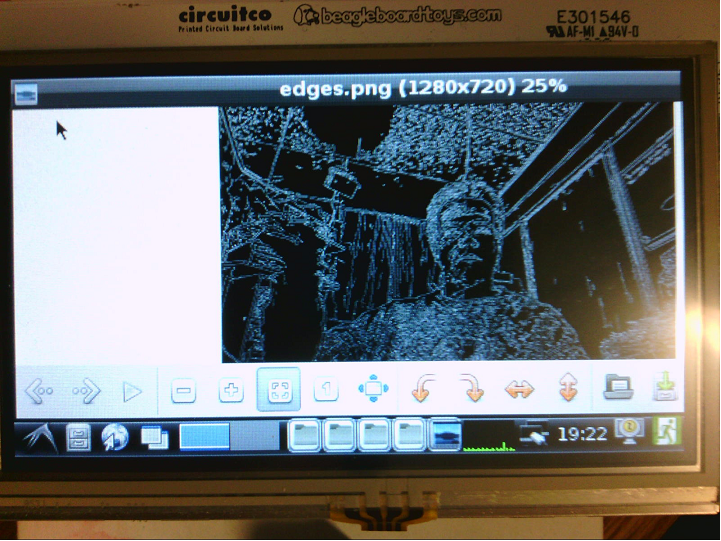
You will see that three images are created. Copy them back to your local machine and look at them.
Examples are shown in the Figure below
Measuring how long it takes to snap a photo and how big they are
As a last piece, we want to know how long it takes for the photo to be snapped.
Copy your custom program to the Beaglebone. Connect your two oscilloscope channels to the two LED pins and measure how much time it takes for a picture to be taken, and how long it takes for the picture to be written to disk. Measure the times for various sizes and plot the relationship between size (i.e. number of pixels) and the time it takes to take the picture, the time it takes to store the picture, and the size of the picture in bytes. Make sure to vary your picture sizes from 320 * 240 to 1920 * 1080.
Assume that images are captured at a rate of 10fps. Assume there are many other processes running, but they don't take up any CPU (just lower the theoretical limit). Complete a table of tasks (with just the image processing task) like we did in class. Pick one of your image capture examples from above, but do not include file saving time in your estimate. What is the largest image size from your experiments that will be guaranteed to meet its deadlines according to rate monotonic analysis? (Again, assume there are many processes, but that only the image capture contributes to the rate monotonic analys.s
Deliverables / Submission
Use the Lab 5 Checklist. I will bring one copy for each team.
(Spring 2017) Your demo of one latency measurement is due in lab. Your full report is due in class Friday of the week in which the lab is performed.
Appendix: Finding the camera
The openCV library should automatically find the camera. You may find the command lsusb from this section helpful in determining the model of your camera.
Finding the camera
Log into the BeagleBone as root. Issue the command The Logitech device is the webcamera. (The camera doesn't automatically show up unless you reboot the beaglebone. Feel free to try. I did.) If you want to use the LCD to see the pictures while they are still on the BeagleBone, use these instructions. To enable the touch-screen on the BeagleBone, we need to uncomment a line in a configuration file. (Without this edit, the screen will simply show as a blank white screen. Log into the beaglebone as root. Edit the file lsusb
Bus 001 Device 002: ID 046d:082d Logitech, Inc. HD Pro Webcam C920
Bus 001 Device 001: ID 1d6b:0002 Linux Foundation 2.0 root hub
Appendix: Reconfiguring BeaglebBone to enable touch-screen
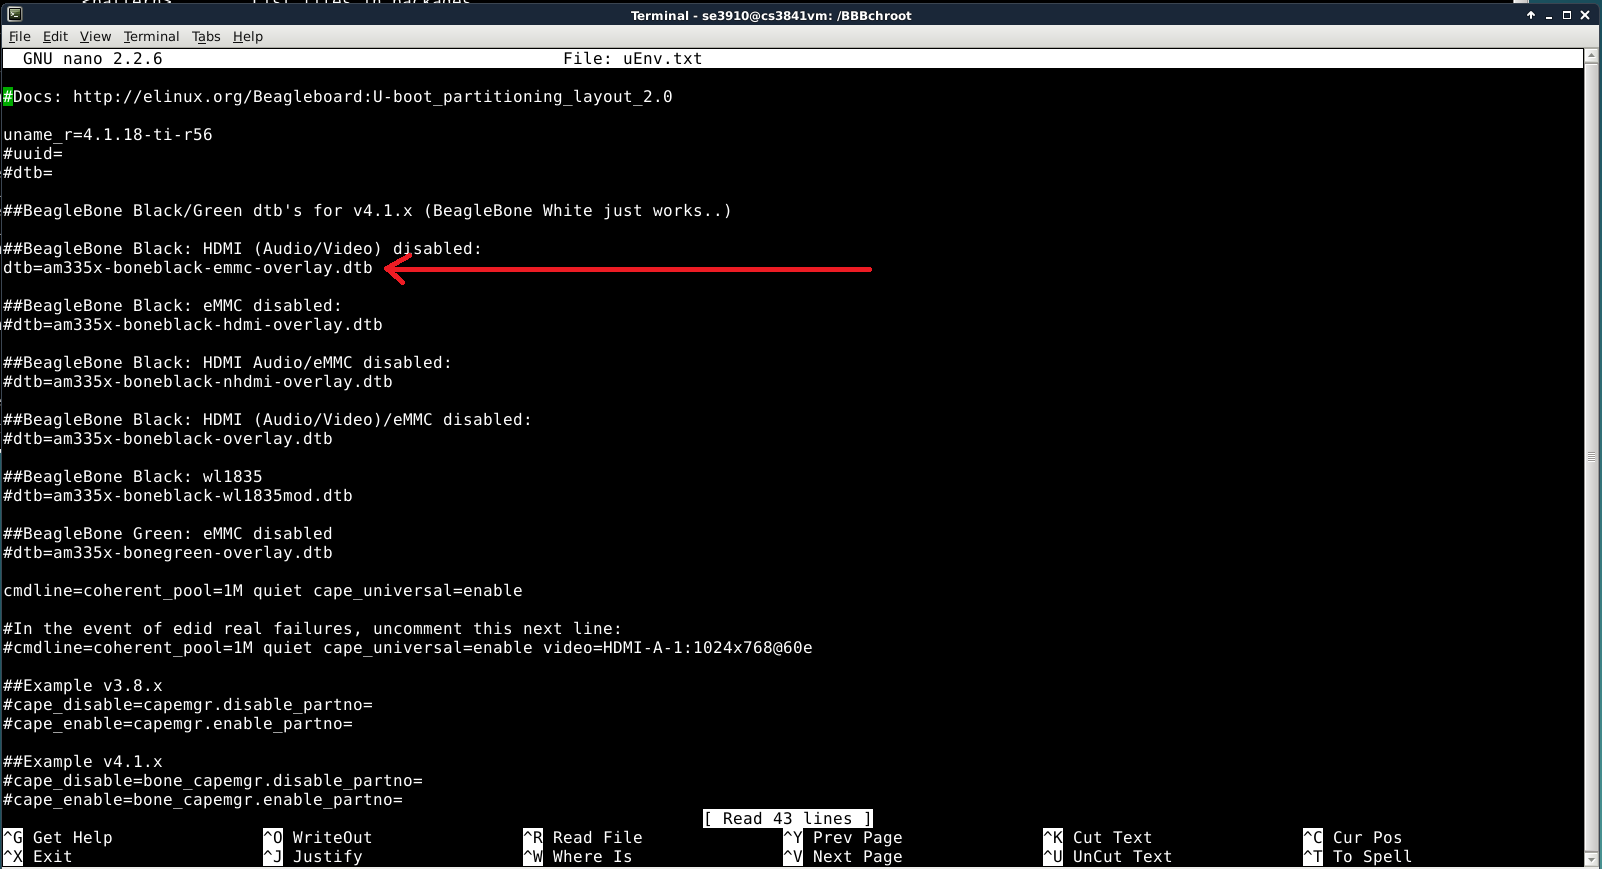
/boot/uEnv.txt, e.g., with nano /boot/uEnv.txt
In the file, uncomment the line to read (see the red arrow in the figure below)
##BeagleBone Black: HDMI (Audio/Video) disabled:
dtb=am335x-boneblack-emmc-overlay.dtb
Now turn off the Beaglebone and proceed to the next step, e.g. with
shutdown nowOr by holding down the power button on the BeagleBone
Connecting the LCD and prototype board
If you plug in anything backward in the next part, it has the potential to damage your BeagleBone or the LCD cape.
Unplug the power to your Beaglebone. Plug the LCD into the breakout board such that the outline on the bottom of the LCD lines up with hole in the breakout cape. (The breakout board is the board with two beaglebone-shaped holes and lots of pins.) Plug the USB camera into the BeagleBone. Plug the beaglebone into either one of the holes in the Breakout cape from underneath. Orient the BeageBone so it lines up with the hole in the cape as well. Push up gently on the BeagleBone. You don't have to push it up all the way; the more gently you put it on the easier it will be to take off without bending the pins. Put the basic protoc cape or the breadboard cape on top of the other hole in the breakout cape, again, aligning it with the hole.
Plug in the Beaglebone through USB and shortly after that, plug in the power adapter. The power adapter is needed because the LCD display draws more power than some USB ports supply. If you don't use the power supply, and your BeagleBone mysteriously reboots, it probably had a brown-out reset. Use the power supply to avoid this.
Once your LCD is plugged in, you can use the power switches on the right side of the LCD to turn off the BeagleBone. Watch out! The Reset switch on the LCD board will also immediately stop the OS without a clean shutdown, just like the one on the main board.
Boot up your Beaglebone. You should automatically see the touchscreen turn on. You may wish to do the calibration, or just let it time out. Then you should see a Linux desktop come up on the LCD screen.
Appendix: Installing header files on the VM
Last week, you used Eclipse to do some development and may have found the code highlighting helpful. To get that for this week's lab, you may need to install Eclipse (and X windows!) in your changeroot (which sounds like a real challenge) or compile your example code for the VM outside of the changeroot, and for the BBB inside the changeroot.
These instructions are for yet another alternative -- where you partially cross-compile for the BBB outside of the changeroot. I don't imagine you will need them.
Due to some technical issues with the Beaglebone development environment and the currently available cross compilation libraries, we are not able to link our code in the cross compiled environment. We can, however, use Eclipse to write and compile our code locally, getting a great deal of the benefit of the IDE's error-checking abilities. We will, however, be forced to re-compile and link the code on the Beaglebone to create the working executable.
To start, download the tar file lab5update2.tar.gz. This file contains a script and an install set. Place the tar file somewhere reachable by the VM and, from within the VM, unzip it with the command
tar zxvf lab5update2.tar.gzNow, from the newly created folder lab5, run the script lab5setup.sh as root:
cd lab5sudo ./lab5setup.shThis will install the library header files in the appropriate locations for the tools to work properly.
(You can look into this plain-text file to see what the script does, if you are curious.)
Appendix: Taking a snapshot of your virtual machine
Once you snapshot your VM, all further changes will be stored on your C drive. Should your C drive need to be reimaged, you will lose all changes beyond the snapshot. I speak from experience. -- Dr. Yoder
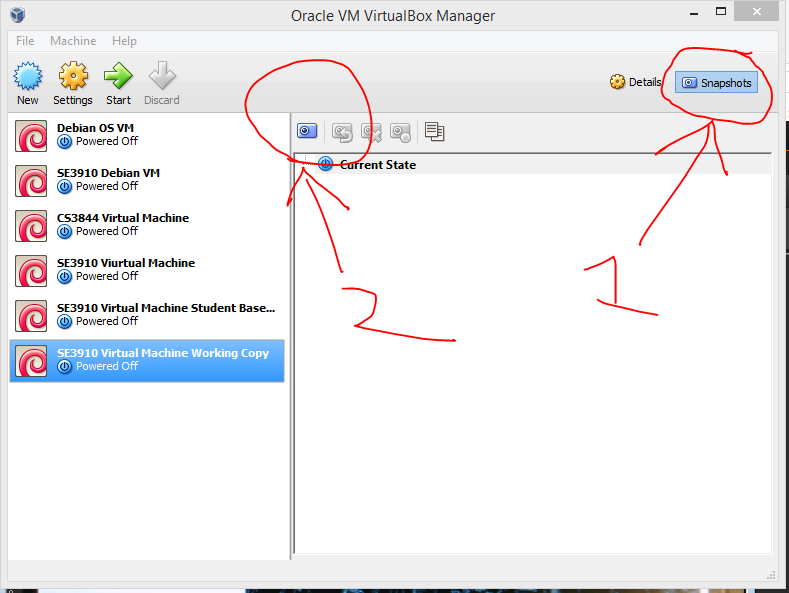
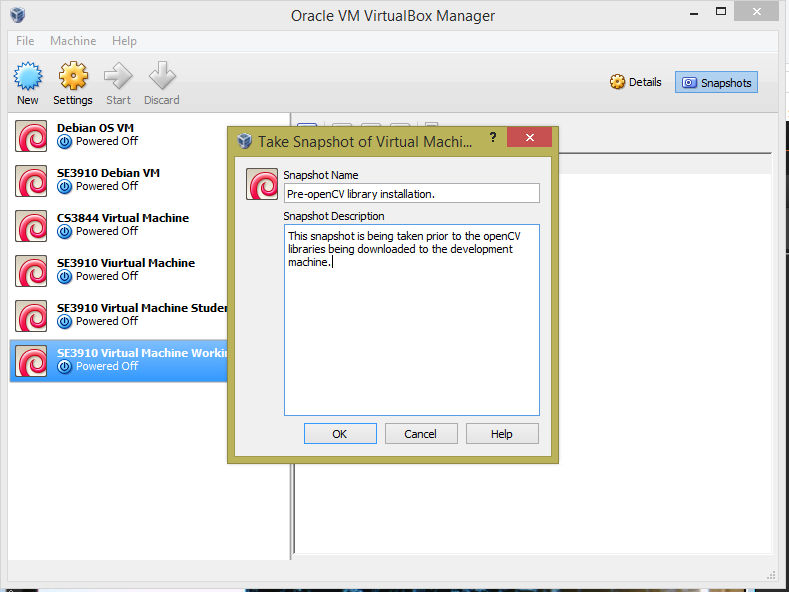
If you take a snapshot of your virtual machine, and you later have problems, you can easily recover the machine back to the previous state. To do this, select the snapshots tab in the upper right and click on the "take snapshot" icon that appears to the left. Provide a meaningful name for the snapshot and a description prior to pressing OK. This will take a few seconds, but now it is possible to revert back to the previous state if something goes wrong.
If you have any questions, consult your instructor.
Acknowledgement: This lab originally developed by Dr. Schilling.
Due: Week 6, Monday, 11pm